概述
一年前,GCC 基金会使用 Kiln 服务商进行了 128 ETH 质押,但最近 Kiln 服务商出现了可能的安全问题,为了保持用户资金安全,Kiln 选择提取了所有质押者的资金。本文主要介绍以下内容:
- ETH2 质押的基础原理和密码学原语
- ETH2 验证者生命流程中的存款和退出环节
- Kiln 服务商的工作原理
需要注意的,本文不会着重介绍以太坊 PoS 算法的基本原理,本文不会设计 LMD Ghost 和 Casper FFG 算法的介绍,假如读者对 PoS 算法感兴趣,可以阅读 eth2book 一书。本部分所有内容都是按照 Pectra 升级后的标准编写,请读者注意文章所采用的标准。
前置知识
在 ETH PoS 协议中,几乎所有的协议内的 消息 都会被使用 SSZ 编码格式进行编码,并使用 SSZ 哈希根 校验信息的完整性。
过去以太坊执行层一直使用 RLP 作为标准的编码格式,关于 RLP 的具体协议规范,读者可以阅读 以太坊执行层P2P网络架构与设计:Discv5 的 RLP 编码 一节。
在标准的 SSZ 的 spec 文档内,开发者主要使用了 Python 类语法进行了定义和介绍。本文主要使用 micro-eth-signer 为读者演示 SSZ 编码结果和过程。SSZ 具有以下两个特点:
- SSZ 是一种非自描述的编码方法,即所有 SSZ 编码后的二进制内容都需要制定类型才可以进行解码,否则我们无法将其进行正确的解码。这也意味着由于制定的类型不同,同一段 SSZ 编码结果可能存在两种不同的解码结果
- SSZ 对于变长类型使用了类似 ABI 编码的方法,将定长类型和变长类型区分为两部分,通过
offset偏移指向变长部分
对于非变长的类型,SSZ 处理较为简单。我们首先介绍最基础的 uint 类型,SSZ 支持以下 uint 类型:
export const uint8 = basic('uint8', int(1), 0);
export const uint16 = basic('uint16', int(2), 0);
export const uint32 = basic('uint32', int(4), 0);
export const uint64 = basic('uint64', int(8, false), _0n);
export const uint128 = basic('uint128', int(16, false), _0n);
export const uint256 = basic('uint256', int(32, false), _0n);
但需要注意的,SSZ 使用了 little-endian representation 表示方法,比如 12345 的 16 进制表示为 0x3039,使用 uint16 类型进行 SSZ 编码的结果是 0x3930。
import type { Bytes } from "micro-eth-signer/utils";
import * as ssz from "micro-eth-signer/advanced/ssz.js";
import * as P from "micro-packed";

const padh = (n: number | bigint, pad: number) =>
  n.toString(16).padStart(pad, "0");

const bytesToHex = (b: Bytes): string =>
  Array.from(b)
    .map((e) => padh(e, 2))
    .join("");

const example = ssz.uint16.encode(BigInt("12345"));
console.log(bytesToHex(example));
另一个简单类型是 boolean 类型,该类型只有 0x00 false 和 0x01 true 两种情况。
接下来,我们介绍较为复合类型中较为简单的非变长复合类型,这些类型包括:
Vector[type; N]类型,该类型内会存储N个类型为type的值Bitvectors[N]类型,该类型会存储N个位,可以视为Vector[boolean, N]的等效替代,但Bitvectors的编码更加紧凑
我们首先介绍 Vector[type; N] 的编码方法,简单来说就是直接将 N 个数值按照 type 约定的编码方法进行编码,然后直接连接在一起,比如 Vector[uint8, 4](1, 5, 0, 2) 会被编码为 01050002
const example = ssz.vector(4, ssz.uint8).encode([1, 5, 0, 2]);
console.log(bytesToHex(example));
而 Bitvectors[N] 会被转化为 little-endian bit format 的 16 进制整数。比如 Bitvectors[7](0,0,0,0,0,0,1) 会被编码为 10,其二进制表示为 0b10000。而 Bitvectors[9](0,0,0,0,0,0,0,1) 会被编码为 1000,其二进制表示为 0b1000000000000。由于 9 bit 数据需要 2 bytes 编码,所以 SSZ 编码器会对 0,0,0,0,0,0,0,1 进行高位 0 填充,然后将其转化为整数。
接下来,我们介绍变长类型。变长类型包含以下两类:
Lists[type, N]是变长版本的Vectors类型,但需要注意的我们仍需要指定最大长度N。最大长度N的存在不是为了序列化或者反序列化而是用于 Merkle Tree 的生成Bitlists[N]是变长版本的Bitvectors类型,此处的N也用于表示最大长度,用于 Merkle Tree 的生成
只考虑单独的 List 类型编码,该类型编码实际上与 Vectors 类型是一致的,比如 Vector[uint8, 3](1, 2, 3) 会被编码为 010203,对应的代码如下:
const example = ssz.vector(3, ssz.uint8).encode([1, 2, 3]);
console.log(bytesToHex(example));
实际上,Vector[uint8, 3](1, 2, 3) 也会被编码为 010203。当我们在复合类型(即后文介绍的 Containers ) 中使用 List 类型时,我们会发现 Lists 和 Vector 的不同。比如我们定义如下类型:
const example = ssz
  .container({ x: ssz.uint8, y: ssz.list(16, ssz.uint8), z: ssz.uint16 })
  .encode({
    x: 1,
    y: [2, 3, 4, 5],
    z: 6
  });
console.log(bytesToHex(example));
上述代码的输出结果为 0107000000060002030405。我们可以将此输出结果拆解为如下部分:
| Index | Data |
|---|---|
| 0 | x = 01 |
| 1 | y offset = 07000000 |
| 5 | z = 0600 |
| 7 | y data = 02030405 |
上述表格内的第一列 Index 代表数据在 0107000000060002030405 内的索引,该索引使用了 byte 作为单位。而第二列代表数据。我们可以看到在进行复合类型 container 编码时,ssz 会首先将变长类型,如上文内的 y 视为 uint32 编码进去,具体的数值是 y 的实际部分在编码后数据内的偏移。然后完成所有静态类型编码后,ssz 会在最后填充 y 的实际数据。
我们可以将 container 编码分成两步理解:
- 第一步将动态类型视为
uint32类型,如上文的example会被视为{ x: ssz.uint8, y: ssz.uint32, z: ssz.uint16 }进行编码,其中y的位置会被存入y的实际内容在编码后数据的偏移量 - 第二步将动态类型的数据放到静态类型编码结果的最后
接下来,我们介绍 Bitlists[N] 的编码方法,由于 Bitlists 是一个动态类型,所以数据是变长的。在上文内,我们提到 Bitvectors 内在编码过程中会填充 0 使得编码结果长度是 8 的整数。所以假如目前存在一个 13bit 长度的 Bitlists。我们只使用编码结果和类型只能断定 Bitlists 的长度在 9 到 16 位之间。为了解决这个问题,我们引入了额外的 1 位来标识 Bitlists 的末尾。我们称这额外的位为 single sentinel bit。
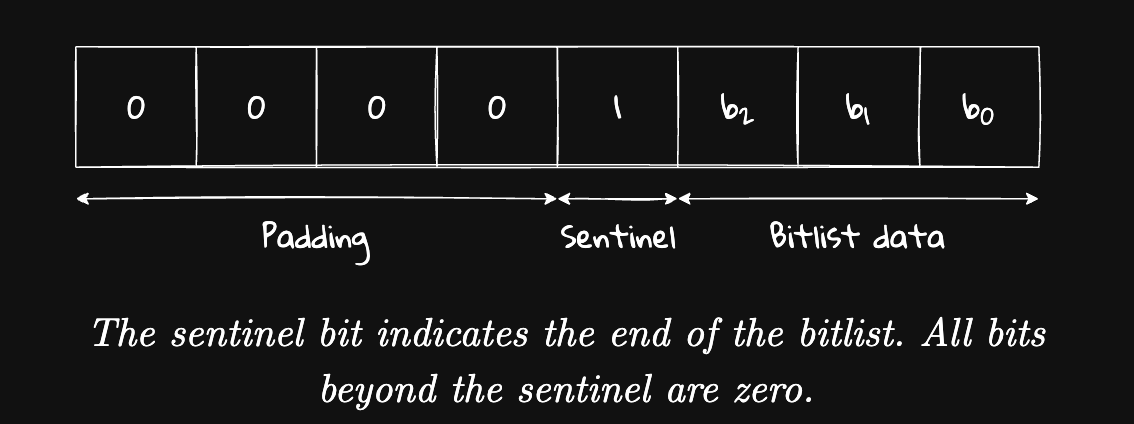
当然,single sentinel bit 对长度为 8 的 Bitlists 也是有效的,如以下代码输出是 ff01(0b1111111100000001):
const example = ssz
  .bitlist(8)
  .encode([true, true, true, true, true, true, true, true]);
console.log(bytesToHex(example));
最后,我们处理一下 ETH2 Book 内的一个有趣练习。该练习要求我们给出 Vector[List[uint8,3],4]([1,2],[3,4,5],[],[6]) 的编码结果。按照上文的介绍,我们应该首先将 List[uint8,3] 视为 uint32 进行静态部分的编码:
[1, 2] offset -> 4 bytes, data: 2 bytes
[3,4,5] offset -> 4 bytes, data: 3 bytes
[] offset -> 4 bytes, data: 0 bytes
[6] offset -> 4 bytes, data: 1 bytes
那么我们可以上述类型的静态部分占据了 16 bytes,进一步可以计算出 [1, 2] 在动态类型中的偏移是 16,使用 uint32 编码后的结果是 10000000,以此类推,[3,4,5] 的偏移是 18,编码结果是 12000000,而 [] 的偏移是 21,编码后是 15000000,[6] 的偏移也是 21,编码结果是 15000000。由此我们就完成了静态部分编码,对于动态部分编码,List 类型的编码是较为简单的。最终可以获得如下编码结果:
10000000
12000000
15000000
15000000
0102
030405
06
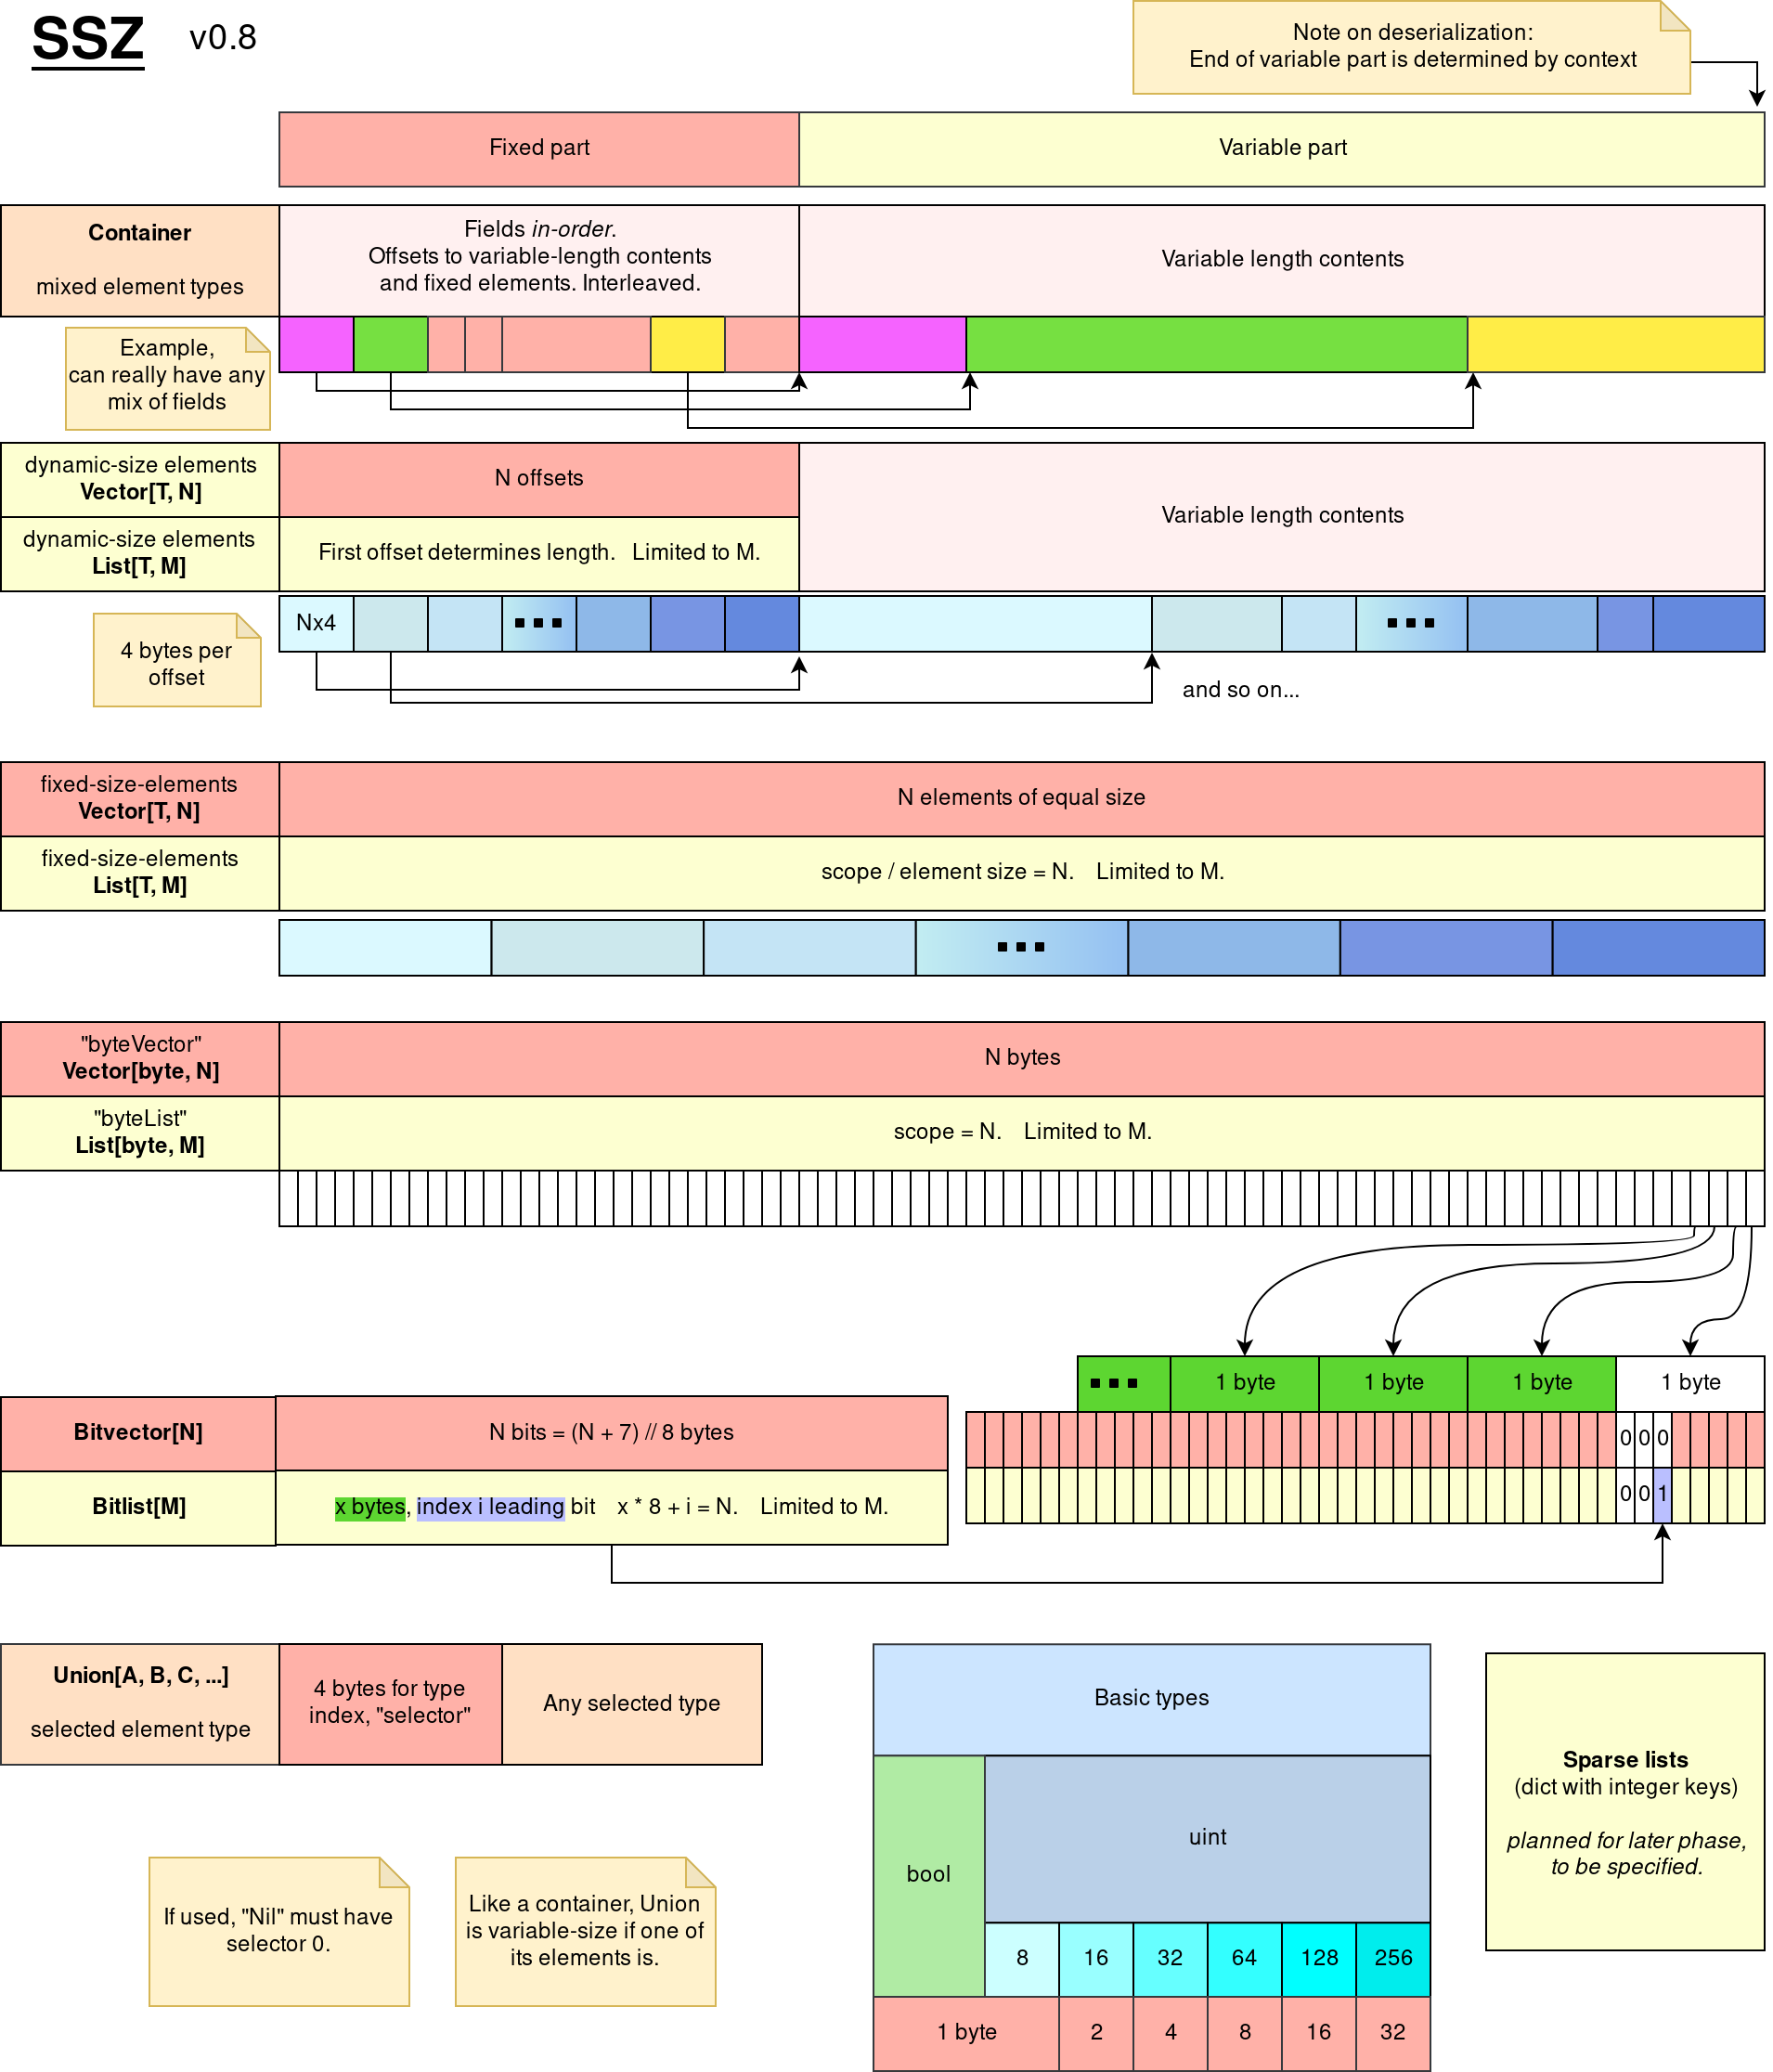
下图展示了 SSZ 的编码规则,该图来自 ETH2 docs 仓库:
以太坊内部其实约定了大量的 contrainer 用于共识层进行消息交互,比如在后文中,我们会用到如下类型:
class DepositData(Container):
    pubkey: BLSPubkey
    withdrawal_credentials: Bytes32
    amount: Gwei
    signature: BLSSignature  # Signing over DepositMessage
该类型内的使用了一些别名,比如 BLSPubkey 实际上就是 Bitvectors[48],而 Bytes32 就是 Bitvectors[32]类型,而 Gwei 是 uint64 类型,BLSSignature 就是 Bitvectors[96] 类型。由于这些都是静态类型,所以我们可以直接进行编码。读者可以在 ETH2 Book Containers 或者 consensus-specs 找到这些共识层消息的定义,当然本文一直使用的 micro-eth-signer 内部也包含了 这些定义。
在 contrainer 内,存在一个庞大的 BeaconState 类型,该类型表示当前 Beacon 链的状态,该类型包含的数据如下:
const BeaconState = container({
  genesis_time: uint64,
  genesis_validators_root: Root,
  slot: Slot,
  fork: Fork,
  latest_block_header: BeaconBlockHeader,
  block_roots: vector(SLOTS_PER_HISTORICAL_ROOT, Root),
  state_roots: vector(SLOTS_PER_HISTORICAL_ROOT, Root),
  historical_roots: list(HISTORICAL_ROOTS_LIMIT, Root),
  eth1_data: Eth1Data,
  eth1_data_votes: list(EPOCHS_PER_ETH1_VOTING_PERIOD * SLOTS_PER_EPOCH, Eth1Data),
  eth1_deposit_index: uint64,
  validators: list(VALIDATOR_REGISTRY_LIMIT, Validator),
  balances: list(VALIDATOR_REGISTRY_LIMIT, Gwei),
  randao_mixes: vector(EPOCHS_PER_HISTORICAL_VECTOR, Bytes32),
  slashings: vector(EPOCHS_PER_SLASHINGS_VECTOR, Gwei),
  previous_epoch_participation: list(VALIDATOR_REGISTRY_LIMIT, ParticipationFlags),
  current_epoch_participation: list(VALIDATOR_REGISTRY_LIMIT, ParticipationFlags),
  justification_bits: bitvector(JUSTIFICATION_BITS_LENGTH),
  previous_justified_checkpoint: Checkpoint,
  current_justified_checkpoint: Checkpoint,
  finalized_checkpoint: Checkpoint,
  inactivity_scores: list(VALIDATOR_REGISTRY_LIMIT, uint64),
  current_sync_committee: SyncCommittee,
  next_sync_committee: SyncCommittee,
  latest_execution_payload_header: ExecutionPayloadHeader,
  next_withdrawal_index: WithdrawalIndex,
  next_withdrawal_validator_index: ValidatorIndex,
  historical_summaries: list(HISTORICAL_ROOTS_LIMIT, HistoricalSummary),
});
并且随着以太坊不断升级,BeaconState 内部会不断增加新的数据。那么我们该如何判断两个 Beacon 节点内的状态是一致的?一个最简单的方法是直接将整个 BeaconState 进行哈希计算,但是这会造成大量的性能开销,大部份 BeaconState 内部的数据是长时间不会发生变化的,另一个方法就是以太坊执行层一直都在使用的方法,即通过 Merkle Tree 计算 Merkle Root。
对于 Merkle Tree 的构建,我们可以使用以下图片简单概括:

上图来自 What is a Merkle Tree?,推荐对 Merkle Tree 不熟悉的用户阅读。我们可以构建如下代码计算任意多元素构成的数组的 Merkle Tree Root:
import { sha256 } from "@noble/hashes/sha2.js";
import * as P from "micro-packed";
import { isBytes, type Bytes } from "micro-eth-signer/utils";
import { hexToBytes, bytesToHex } from "@noble/hashes/utils";

const BYTES_PER_CHUNK = 32; // Should be equal to digest size of hash
const EMPTY_CHUNK = new Uint8Array(BYTES_PER_CHUNK);
const hash = (a: Uint8Array, b: Uint8Array): Uint8Array =>
  sha256.create().update(a).update(b).digest();
const mixInLength = (root: Uint8Array, length: number) =>
  hash(root, P.U256LE.encode(BigInt(length)));

// Will OOM without this, because tree padded to next power of two.
const zeroHashes = /* @__PURE__ */ (() => {
  const res: Bytes[] = [EMPTY_CHUNK];
  for (let i = 0; i < 64; i++) res.push(hash(res[i], res[i]));
  return res;
})();

export const merkleize = (chunks: Uint8Array[], limit?: number): Uint8Array => {
  let chunksLen = chunks.length;
  if (limit !== undefined) {
    if (limit < chunks.length) {
      throw new Error(
        `SSZ/merkleize: limit (${limit}) is less than the number of chunks (${chunks.length})`,
      );
    }
    chunksLen = limit;
  }
  // log2(next power of two), we cannot use binary ops since it can be bigger than 2**32.
  const depth = Math.ceil(Math.log2(chunksLen));

  if (chunks.length == 0) return zeroHashes[depth];
  for (let l = 0; l < depth; l++) {
    const level = [];
    for (let i = 0; i < chunks.length; i += 2)
      level.push(
        hash(chunks[i], i + 1 < chunks.length ? chunks[i + 1] : zeroHashes[l]),
      );

    chunks = level;
  }

  return chunks[0];
};
注意,上述代码描述的 merkleize 是以太坊共识层的 规范。此处构建了一棵平衡二叉树,同时该树的深度是 Math.ceil(Math.log2(chunksLen))。同时,假如 chunks 的长度不是 2 的倍数,那么就会通过补 0 计算最终的 Merkle Tree Root。所以以下代码内的 [a, b, c] 和 [a, b, c, z] 输出的结果是一致的。
const a = P.U256LE.encode(1n);
const b = P.U256LE.encode(2n);
const c = P.U256LE.encode(3n);

const z = P.U256LE.encode(0n);

console.log(bytesToHex(merkleize([a, b, c])));
console.log(bytesToHex(merkleize([a, b, c, z])));
那么我们已经定义好了共识层内的 Merkle Tree 的构建,那么下一步就是将我们上文中的各种类型编码后的结果转化为 chunks。将编码结果转化为 chunks 的方法很简单,每一个 chunks 都是 32 bytes 长度。假如编码后的结果长度小于 32 bytes,会在右侧进行补 0 操作(right-padded)。对于 Bitlist[N] 和 Bitvector[N] 类型,编码后的数据会被拆分为 (N + 255) // 256 个块;对于 List[B, N] 和 Vector[B, N],编码后的数据会被拆分为 (N * size_of(B) + 31) // 32 个块。
我们首先关注一个简单类型的 Merkle Tree Root 的计算方法,该类型定义如下:
const Epoch = ssz.uint64;
const Root = ssz.bytevector(32);
const Checkpoint = ssz.container({ epoch: Epoch, root: Root });
const merkleRoot = Checkpoint.merkleRoot({
  epoch: 3,
  root: hexToBytes(
    "49e21ba6fbe660d8aac793f1e168cdbf860a3b5b1791bdab188ba1c4b094b813",
  ),
});
console.log(bytesToHex(merkleRoot));
输出结果为 07374e926a0b9f103facaf208315d2138f59e00a495f04786bf3bf46fbc85b92。实际上,该结果背后的原理是:
const epoch = P.U256LE.encode(3n);
const root = hexToBytes(
  "49e21ba6fbe660d8aac793f1e168cdbf860a3b5b1791bdab188ba1c4b094b813",
);

console.log(bytesToHex(merkleize([epoch, root])));
此处的 uint64 类型的 Epoch 需要向右填充为 uint256。此处我们直接使用了 P.U256LE 类型,该类型是小端编码 uint256 类型。我们可以尝试对较为复杂的 attesting_indices 进行编码,该类型定义如下:
const ValidatorIndex = ssz.uint64;
const MAX_VALIDATORS_PER_COMMITTEE = 2048;

const indicesMerkleRoot = ssz
  .list(MAX_VALIDATORS_PER_COMMITTEE, ValidatorIndex)
  .merkleRoot([33652, 59750, 92360]);

const indicesMerkleData = ssz
  .list(MAX_VALIDATORS_PER_COMMITTEE, ValidatorIndex)
  .encode([33652, 59750, 92360]);

console.log(`Merkle Root: ${bytesToHex(indicesMerkleRoot)}`);
console.log(`Indices Data: ${bytesToHex(indicesMerkleData)}`);
以上代码的输入为:
Merkle Root: 214cd7a61e14fd150b1b3cd8a1499851190f003f35714d590b780e5e91a36272
Indices Data: 748300000000000066e9000000000000c868010000000000
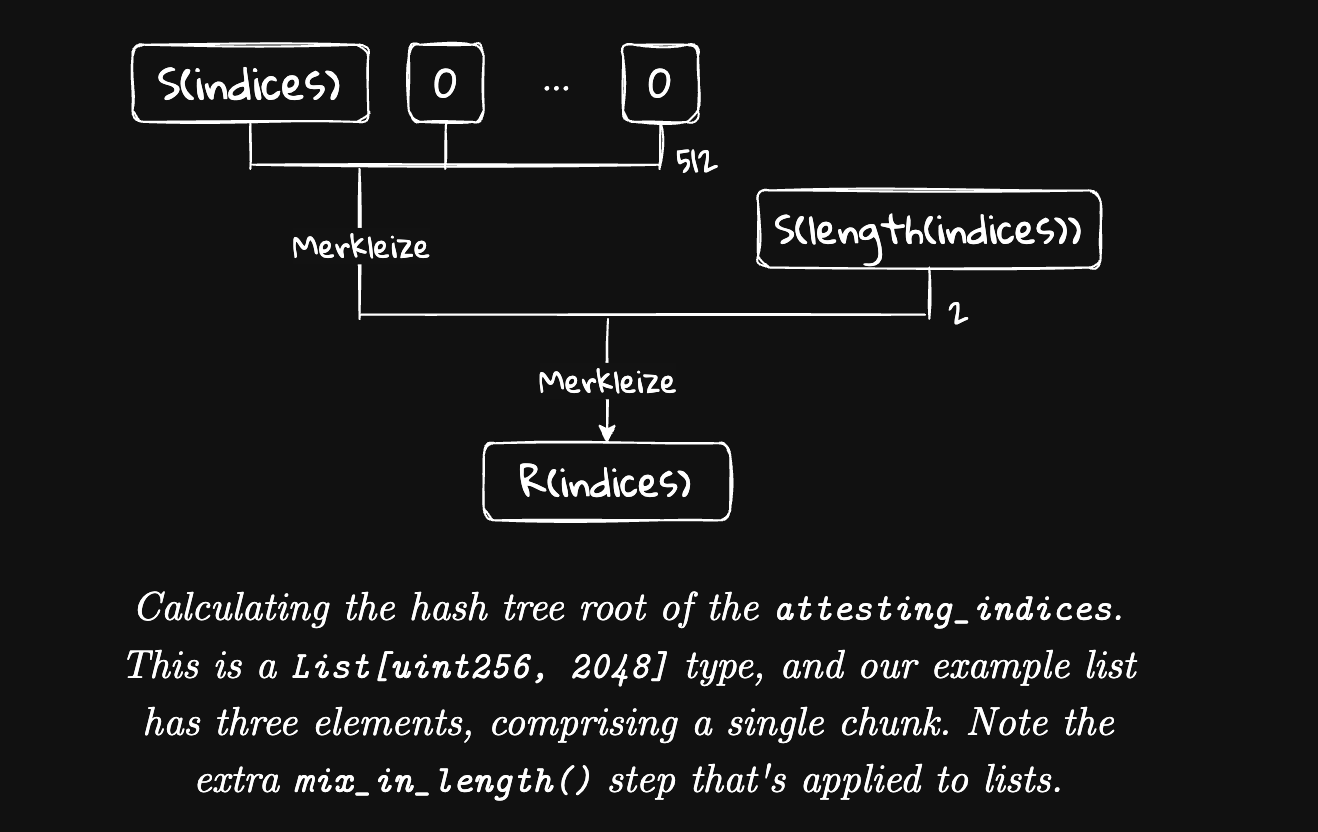
我们可以看到编码后的 indicesMerkleData 的长度并不是 256 bit,此处我们可以通过右侧填充 0 后的 256 bit 长度的数据。此处需要注意的是,在 List 等变长类型编码时,我们需要在 merkle tree 内增加类型的长度 length。我们可以使用以下代码计算出一致的 Merkle Tree Root:
const data = hexToBytes(
  "748300000000000066e9000000000000c8680100000000000000000000000000",
);

console.log(bytesToHex(hash(merkleize([data], 512), P.U256LE.encode(3n))));
对于 List 类型进行 Merkle Tree 构建时,我们已经在上文介绍过编码后的数据会被拆分为 (N * size_of(B) + 31) // 32 块,此处即为 (2048 * 8 + 31) // 32 = 512。所以此处在使用 merkleize 时,我们输入了 limit = 512。最后我们计算 data 的 Merkle Tree 结束后,将长度 3 混入了哈希结果。可视化如下图:
最后,我们介绍一下复杂的复合嵌套类型的 Merkle Tree Root 的计算:
const MAX_VALIDATORS_PER_COMMITTEE = 2048;
const Slot = ssz.uint64;
const Epoch = ssz.uint64;
const CommitteeIndex = ssz.uint64;
const Root = ssz.bytevector(32);
const ValidatorIndex = ssz.uint64;
const BLSSignature = ssz.bytevector(96);

const Checkpoint = ssz.container({ epoch: Epoch, root: Root });

const AttestationData = ssz.container({
  slot: Slot,
  index: CommitteeIndex,
  beacon_block_root: Root,
  source: Checkpoint,
  target: Checkpoint,
});

const IndexedAttestation = ssz.container({
  attesting_indices: ssz.list(MAX_VALIDATORS_PER_COMMITTEE, ValidatorIndex),
  data: AttestationData,
  signature: BLSSignature,
});

const indexData = {
  attesting_indices: [33652, 59750, 92360],
  data: {
    slot: 3080829,
    index: 9,
    beacon_block_root: hexToBytes(
      "4f4250c05956f5c2b87129cf7372f14dd576fc152543bf7042e963196b843fe6",
    ),
    source: {
      epoch: 96274,
      root: hexToBytes(
        "d24639f2e661bc1adcbe7157280776cf76670fff0fee0691f146ab827f4f1ade",
      ),
    },
    target: {
      epoch: 96275,
      root: hexToBytes(
        "9bcd31881817ddeab686f878c8619d664e8bfa4f8948707cba5bc25c8d74915d",
      ),
    },
  },
  signature: hexToBytes(
    "aaf504503ff15ae86723c906b4b6bac91ad728e4431aea3be2e8e3acc888d8af" +
      "5dffbbcf53b234ea8e3fde67fbb09120027335ec63cf23f0213cc439e8d1b856" +
      "c2ddfc1a78ed3326fb9b4fe333af4ad3702159dbf9caeb1a4633b752991ac437",
  ),
};

const attestation = IndexedAttestation.merkleRoot(indexData);
console.log(bytesToHex(attestation));
对于该类型,我们计算 Merkle Tree Root 的方法实际上是对其中每一个构成 IndexedAttestation 的类型进行计算。在此处,我们直接给出最终的计算可视化图形:
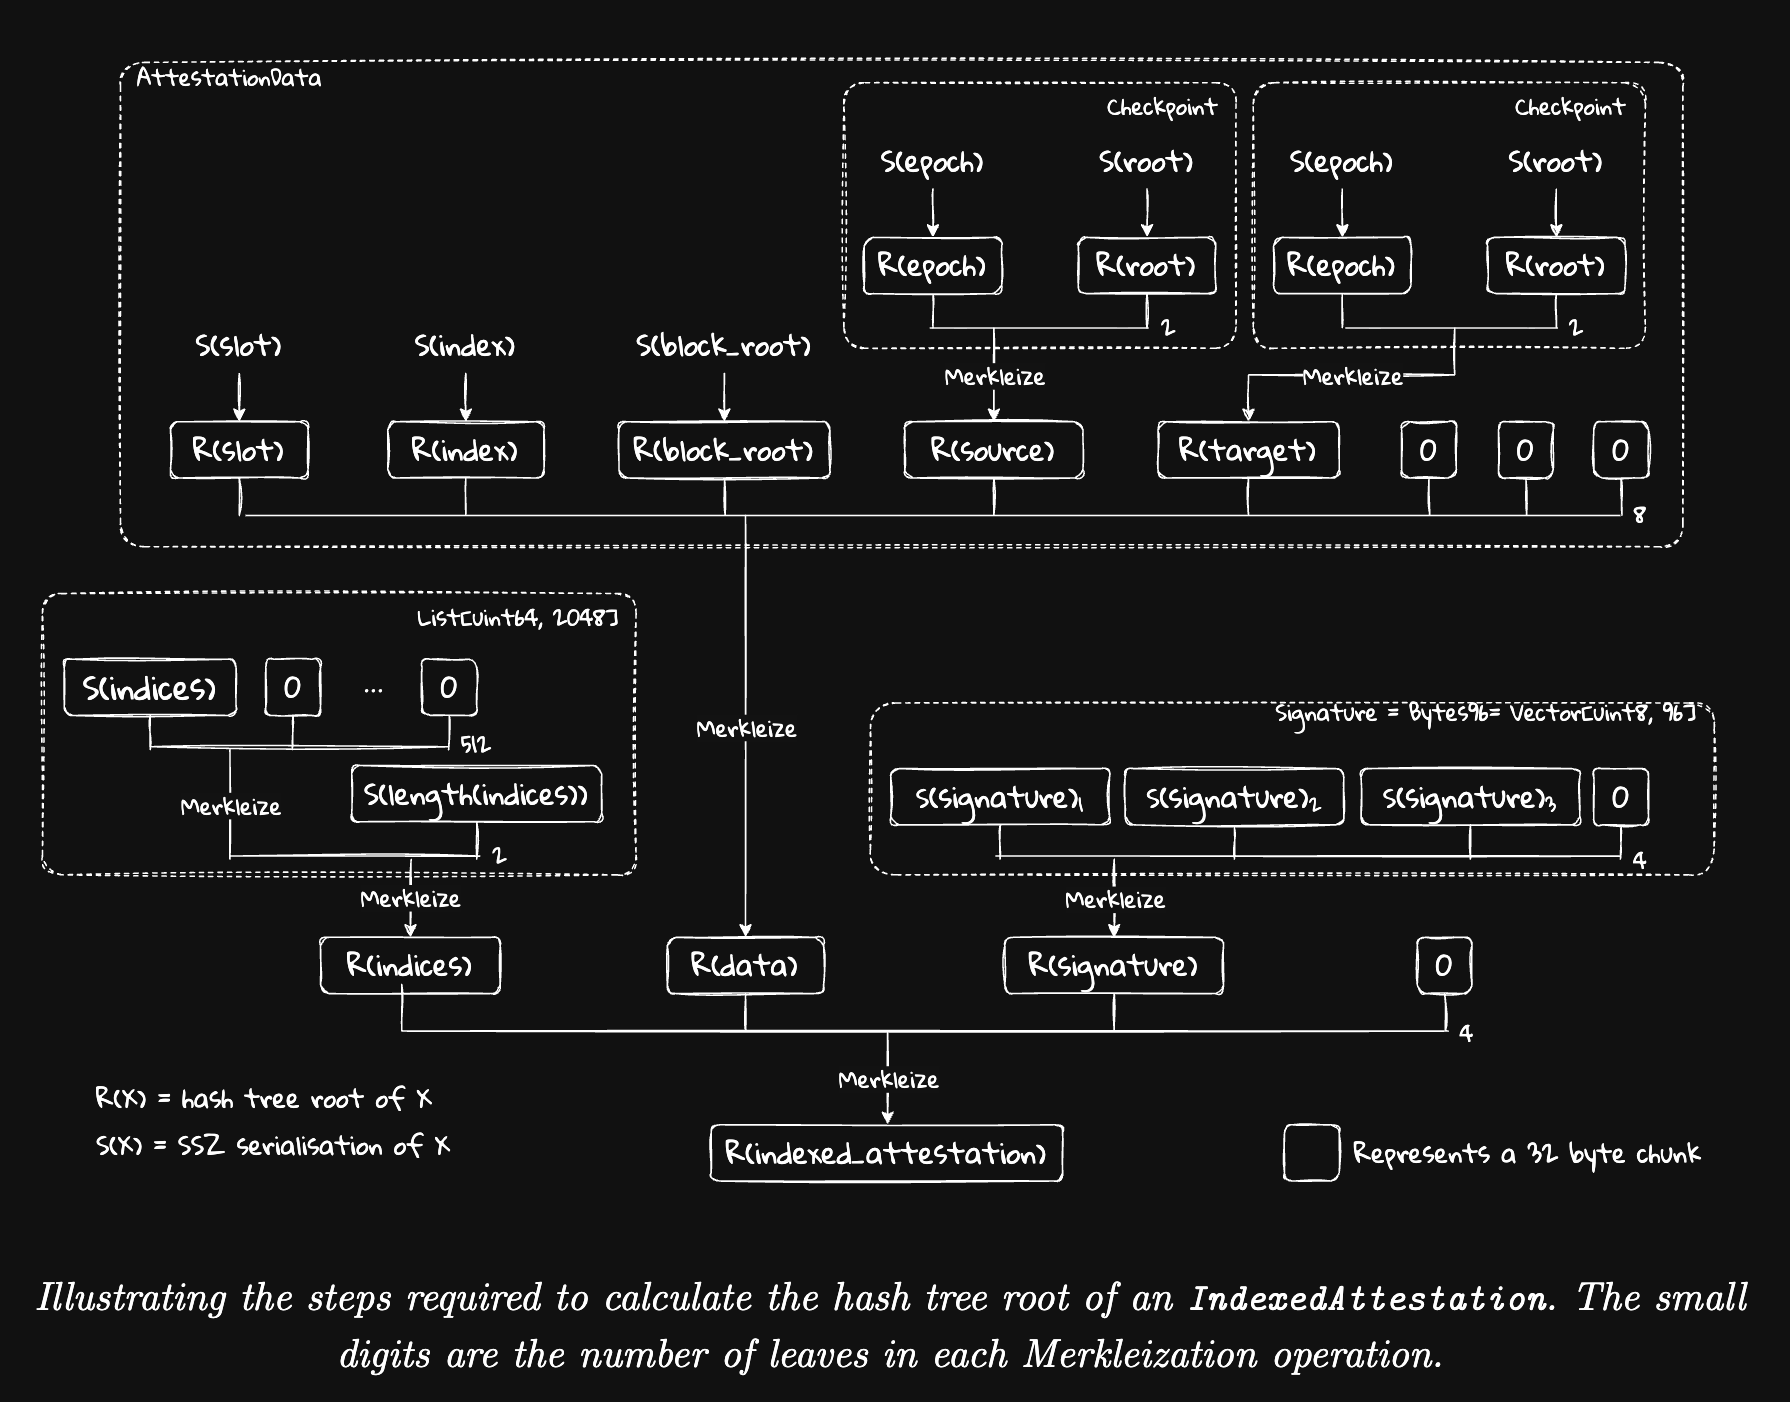
总结来说,SSZ 的 merkle tree 的构建是具有嵌套属性的,我们可以在逐个部分的构建 Merkle Tree 并在最后将其组合起来。在本节的最后,我们观察一个在 solidity 内计算如下类型 Merkle Tree Root 的代码:
class DepositData(Container):
    pubkey: BLSPubkey
    withdrawal_credentials: Bytes32
    amount: Gwei
    signature: BLSSignature  # Signing over DepositMessage
我们已经在上文介绍过 DepositData 中的别名情况,其中 BLSPubkey 实际上就是 Bitvectors[48],而 Bytes32 就是 Bitvectors[32]类型,而 Gwei 是 uint64 类型,BLSSignature 就是 Bitvectors[96] 类型。我们希望在 solidity 内计算 Merkle Tree Root ,计算代码如下:
bytes32 pubkey_root = sha256(abi.encodePacked(pubkey, bytes16(0)));
bytes32 signature_root = sha256(abi.encodePacked(
    sha256(abi.encodePacked(signature[:64])),
    sha256(abi.encodePacked(signature[64:], bytes32(0)))
));
bytes32 node = sha256(abi.encodePacked(
    sha256(abi.encodePacked(pubkey_root, withdrawal_credentials)),
    sha256(abi.encodePacked(amount, bytes24(0), signature_root))
));
上述代码来自以太坊执行层内的共识存款合约,我们会在后文看到该合约内核心函数 deposit 的所有代码。
存款
在 该交易 中,GCC 基金会向 Kiln 的以太坊质押合约转入了 128 ETH 触发了 Kiln 存款合约 的质押操作。我们可以在 Github 内找到该合约的 源代码。
存款合约分析
此处我们首先需要知道 ETH2 的共识层是如何进行存款操作的。在 ETH2 Book 内部对存款操作进行了较为详细的介绍。ETH2 的存款需要调用 存款合约。该合约内最重要的函数是 deposit 函数,该函数的定义如下:
function deposit(
    bytes calldata pubkey,
    bytes calldata withdrawal_credentials,
    bytes calldata signature,
    bytes32 deposit_data_root
) override external payable {
    // Extended ABI length checks since dynamic types are used.
    require(pubkey.length == 48, "DepositContract: invalid pubkey length");
    require(withdrawal_credentials.length == 32, "DepositContract: invalid withdrawal_credentials length");
    require(signature.length == 96, "DepositContract: invalid signature length");

    // Check deposit amount
    require(msg.value >= 1 ether, "DepositContract: deposit value too low");
    require(msg.value % 1 gwei == 0, "DepositContract: deposit value not multiple of gwei");
    uint deposit_amount = msg.value / 1 gwei;
    require(deposit_amount <= type(uint64).max, "DepositContract: deposit value too high");

    // Emit `DepositEvent` log
    bytes memory amount = to_little_endian_64(uint64(deposit_amount));
    emit DepositEvent(
        pubkey,
        withdrawal_credentials,
        amount,
        signature,
        to_little_endian_64(uint64(deposit_count))
    );

    // Compute deposit data root (`DepositData` hash tree root)
    bytes32 pubkey_root = sha256(abi.encodePacked(pubkey, bytes16(0)));
    bytes32 signature_root = sha256(abi.encodePacked(
        sha256(abi.encodePacked(signature[:64])),
        sha256(abi.encodePacked(signature[64:], bytes32(0)))
    ));
    bytes32 node = sha256(abi.encodePacked(
        sha256(abi.encodePacked(pubkey_root, withdrawal_credentials)),
        sha256(abi.encodePacked(amount, bytes24(0), signature_root))
    ));

    // Verify computed and expected deposit data roots match
    require(node == deposit_data_root, "DepositContract: reconstructed DepositData does not match supplied deposit_data_root");

    // Avoid overflowing the Merkle tree (and prevent edge case in computing `branch`)
    require(deposit_count < MAX_DEPOSIT_COUNT, "DepositContract: merkle tree full");

    // Add deposit data root to Merkle tree (update a single `branch` node)
    deposit_count += 1;
    uint size = deposit_count;
    for (uint height = 0; height < DEPOSIT_CONTRACT_TREE_DEPTH; height++) {
        if ((size & 1) == 1) {
            branch[height] = node;
            return;
        }
        node = sha256(abi.encodePacked(branch[height], node));
        size /= 2;
    }
    // As the loop should always end prematurely with the `return` statement,
    // this code should be unreachable. We assert `false` just to be safe.
    assert(false);
}
上述函数需要以下参数:
pubkey在 ETH2 的共识层节点内,共识层需要使用 BLS 私钥进行签名投票以参与共识,此处的pubkey就是 ETH2 节点 BLS 私钥对应的公钥withdrawal_credentials当共识层节点退出时,32 ETH 会被转移给特定用户,而withdrawal_credentials就是特定用户的标识。目前大部分用户都使用 Eth1 withdrawal credentials。目前 GCC 托管的某一个节点的 Eth1 withdrawal credentials 为0x01000000000000000000000071f62786aed65a78c46a6f69c3ba0d5ae9b9cdea,该 credentials 代表 PoS 节点退出时,所有资产转入0x01f62786AEd65A78C46A6F69C3Ba0D5AE9b9Cdea地址signature是使用pubkey对应的私钥对pubkey/withdrawal_credentials/amount三个字段进行签名的结果,此处的amount是指用户当前存入存款合约的 ETH 数量deposit_data_root是哈希根,具体来说是对pubkey/withdrawal_credentials/amount/signature的构成的DepositData进行 Merkle Tree Root 计算
此处可能需要补充,在以太坊 Pectra 硬分叉后引入了 Type2 withdrawal credentials。该类型的提款凭证允许 PoS 节点质押 32 ETH 以上的 ETH。读者可以自己参考以太坊的 MaxEB 文章。此处需要指明的是 Eth1 withdrawal credentials 的好处是质押奖励每隔一段时间都会无 gas 的发送给用户的 ETH1 提款地址,而 Type2 withdrawal credentials 则不会自动发送质押奖励,用户需要隔一段时间手动提取。
在具有上述知识后,我们分析 StakingContract 内部用于存款的核心函数 _depositValidatorsOfOperator 函数,该函数的核心定义如下:
for (uint256 i = vfi.funded; i < vfi.funded + _validatorCount; ) {
    bytes memory publicKey = operator.publicKeys[i];
    bytes memory signature = operator.signatures[i];
    address consensusLayerRecipient = _getDeterministicReceiver(publicKey, CONSENSUS_LAYER_SALT_PREFIX);
    bytes32 withdrawalCredentials = _addressToWithdrawalCredentials(consensusLayerRecipient);
    bytes32 pubkeyRoot = _getPubKeyRoot(publicKey);
    _depositValidator(publicKey, pubkeyRoot, signature, withdrawalCredentials);
    StakingContractStorageLib.getWithdrawers().value[pubkeyRoot] = msg.sender;
    emit Deposit(msg.sender, msg.sender, publicKey, signature);
    unchecked {
        ++i;
    }
}
Kiln 在合约内部的 operator 存储内存入了所有 PoS 节点的存款参数,当用户向 Kiln 质押合约内注入资金时,Kiln 合约会自动查找一个当前未被使用的 PoS 存款参数,并调用以太坊存款合约的 deposit 方法将资金存入 PoS 质押合约。
此处我们格外注意 _getDeterministicReceiver 方法,该方法是保证用户委托资金安全的核心方法。简单来说,Kiln 要求 PoS 奖励和本金只会被发送到一个特定的地址。当用户第一次取款时,Kiln 质押合约会在该地址上部署合约。
通过这种方式,用户在某种程度上可以保证自己委托给 PoS 节点的本金和利息的安全。但假如用户委托资金的 PoS 验证者作恶,违反以太坊的 PoS 规则,这种情况下,用户存入的资金还是会因为 Slash 产生损失。当然,PoS 验证者也无法在 Slash 环节中获得收益。在经济利益角度看,用户委托的 PoS 验证者没有动力做恶。
此处可以简单展示 _getDeterministicReceiver 方法的实现,如下:
/// @notice Internal utility to compute the receiver deterministic address
/// @param _publicKey Public Key assigned to the receiver
/// @param _prefix Prefix used to generate multiple receivers per public key
function _getDeterministicReceiver(bytes memory _publicKey, uint256 _prefix) internal view returns (address) {
    bytes32 publicKeyRoot = _getPubKeyRoot(_publicKey);
    bytes32 salt = sha256(abi.encodePacked(_prefix, publicKeyRoot));
    address implementation = StakingContractStorageLib.getFeeRecipientImplementation();
    return Clones.predictDeterministicAddress(implementation, salt);
}
此处使用了 Openzepplin 的 Clone 代码库,该代码库本质上 ERC-1167 和 create2 实现确定性地址部署合约。假如读者希望进一步了解 ERC1167,可以阅读 EVM底层探索:字节码级分析最小化代理标准EIP1167 一文。
总结来说,Kiln 在质押合约内部预先存储了一批 PoS 验证者的存款数据,当用户存入 ETH 后,存款数据与用户存入的 ETH 就会被发送到 PoS 存款合约。需要特别注意的是,存款数据中的 withdrawal_credentials 使用了 Eth1 格式,并指向了一个合约地址。这意味着 PoS 的收益和退出资金都无法被 PoS 质押节点控制。
我们接下来将讨论上文在以太坊 PoS 存款合约内最重要的部分—— 当前所有存款的 增量 Merkle Tree (incremental Merkle tree,下文中使用 内部 Merkle Tree 指代),而最终计算获得的 Merkle Tree Root 将被用于共识层投票。值得注意的是,存款合约的内部 Merkle Tree 并不是稀疏 Merkle Tree(sparse merkle tree),读者需要区分。
此处的 DEPOSIT_CONTRACT_TREE_DEPTH 是内部 Merkle Tree 的深度。该深度足够容纳 43 亿 ETH 存入,远远大于目前 ETH 的流通量。接下来,我们主要分析内部 Merkle Tree 的构建方法。我们首先需要知道内部 Merkle Tree 是增量构建的。为了实现增量构建,我们的第一步是使用 zeroHash 初始化这棵树。在存款合约的构造器内,我们可以看到如下代码:
bytes32[DEPOSIT_CONTRACT_TREE_DEPTH] branch;
uint256 deposit_count;

bytes32[DEPOSIT_CONTRACT_TREE_DEPTH] zero_hashes;

constructor() public {
    // Compute hashes in empty sparse Merkle tree
    for (uint height = 0; height < DEPOSIT_CONTRACT_TREE_DEPTH - 1; height++)
        zero_hashes[height + 1] = sha256(abi.encodePacked(zero_hashes[height], zero_hashes[height]));
}
我们在下图内可视化了这颗初始化后全部节点都为 0 的 Merkle Tree。我们可以看到每一个高度只有一个值,所以我们可以使用 zero_hashes 列表存储所有的层的零哈希值。

我们首先考虑如何在上述内部 Merkle Tree 内插入新的节点。deposit 函数内存在如下代码用于向 Merkle Tree 内插入节点:
// Add deposit data root to Merkle tree (update a single `branch` node)
deposit_count += 1;
uint size = deposit_count;
for (uint height = 0; height < DEPOSIT_CONTRACT_TREE_DEPTH; height++) {
    if ((size & 1) == 1) {
        branch[height] = node;
        return;
    }
    node = sha256(abi.encodePacked(branch[height], node));
    size /= 2;
}
在第一次节点插入时,我们假设插入的节点的值是 v0,此时上述函数内的 size 是 1,所此 branch[0] = node 被执行,结果如下:

当我们获得这棵树后,我们下一步工作是计算这棵树的 Merkle Tree Root,在 deposit 智能合约内部,存在以下代码用于计算内部 Merkle Tree 的根。代码如下:
function get_deposit_root() override external view returns (bytes32) {
    bytes32 node;
    uint size = deposit_count;
    for (uint height = 0; height < DEPOSIT_CONTRACT_TREE_DEPTH; height++) {
        if ((size & 1) == 1)
            node = sha256(abi.encodePacked(branch[height], node));
        else
            node = sha256(abi.encodePacked(node, zero_hashes[height]));
        size /= 2;
    }
    return sha256(abi.encodePacked(
        node,
        to_little_endian_64(uint64(deposit_count)),
        bytes24(0)
    ));
}
下图展示计算 Merkle Tree Root 的计算过程。我们在 v0 节点插入时,已经将 branch[0] = v0 写入了合约存储,所以此处首先会触发 (size & 1) == 1 的代码,计算出 update node 1 的值,注意,该计算只是在内存内中进行计算,而没有将计算结果写入存储。我们获得了 update node 1 的值后,只需要简单计算 sha256(abi.encodePacked(node, zero_hashes[height])) 就可以获得最终 Merkle Tree Root 的值。
继续回到节点插入的有关代码,我们可以看看插入 v1 会导致 Merkle Tree 发生哪些更新。为了方便读者理解计算流程,我们在此处再次展示更新 Merkle Tree 的代码:
deposit_count += 1;
uint size = deposit_count;
for (uint height = 0; height < DEPOSIT_CONTRACT_TREE_DEPTH; height++) {
    if ((size & 1) == 1) {
        branch[height] = node;
        return;
    }
    node = sha256(abi.encodePacked(branch[height], node));
    size /= 2;
}
此时 size = 2,此时并不会进入 (size & 1) == 1 ,而只是计算 node = sha256(abi.encodePacked(branch[height], node));。我们在上文插入 v0 时已经将 branch[0] 更新为 v0 的值,所以此处计算的结果是 v0 和 v1 的 Merkle Tree Root。此时执行 size /= 2 代码,size 被更新为 1,可以执行 (size & 1) == 1 的程序,此时 branch[1] = node; 被执行,node 的值被写入存储。最终获得的树如下图所示:

此时再次执行 get_deposit_root 操作,我们第一次会进入 else 分支,计算 node = sha256(abi.encodePacked(0, zero_hashes[0]));,计算结果其实就是 zero_hashes[1],然后更新 size = 1,此时继续计算 node = sha256(abi.encodePacked(branch[1], node));,计算结果刚好是 Merkle Tree Root。
function get_deposit_root() override external view returns (bytes32) {
    bytes32 node;
    uint size = deposit_count;
    for (uint height = 0; height < DEPOSIT_CONTRACT_TREE_DEPTH; height++) {
        if ((size & 1) == 1)
            node = sha256(abi.encodePacked(branch[height], node));
        else
            node = sha256(abi.encodePacked(node, zero_hashes[height]));
        size /= 2;
    }
    return sha256(abi.encodePacked(
        node,
        to_little_endian_64(uint64(deposit_count)),
        bytes24(0)
    ));
}
在上文,我们已经演示了在一个较小的树内的插入和 Merkle Tree Root 计算的方法,读者可以自行尝试使用数学归纳法严格证明上述在较小树内的操作可以对任意大的树实现。当然,这方面的证明已经存在以太坊协议研究员证明,比如 Runtime Verification 使用自己的 K 形式化证明预言给出了一个 证明。
一个比较悲伤的消息时,目前共识层其实不并会依赖
get_deposit_root返回的结果,因为在最近的 Pectra 升级内,共识层正式启动了 Validator deposits on chain 机制(EIP-6110),我们会在后文介绍该机制。
存款共识层操作
在上文我们已经介绍了存款合约内发生的所有事情,特别是存款合约内 Merkle Tree Root 的插入和计算操作。在本节中,我们主要分析共识层节点如何处理存款操作。第一个问题是最简单的,即共识层节点如何知道用户向存款合约内存入了 ETH?
在上文分析以太坊的存款合约时,我们可以看到合约在存入 ETH 时都会抛出时间,而共识层节点就会监控该事件的抛出来获取当前区块的存款情况。在一些较久的材料内,会出现 Eth1Data 容器和 Eth1 voting 等内容,比如 ETH2 Book 中的 Deposit Processing。在 Merge 之前,由于共识层和执行层并不是统一的,执行层使用 PoW 算法,而共识层使用了 PoS 算法,所以会出现执行层可能有动力通过 PoW 挖矿双花执行层的可能性,所以当时共识层只对 2048 个区块前存款进行处理,来避免可能的双花。但是随着 Merge 的完成,共识层也拿到了出块的权力,所以共识层实际上不再需要这种延迟机制保障自身不会被双花。所以在 Pectra 升级中,我们彻底停止了 Eth1Data 等机制。当然,目前区块内还残留有 Eth1Data 数据,下图展示了笔者在编写文章时的一个最新 slot:
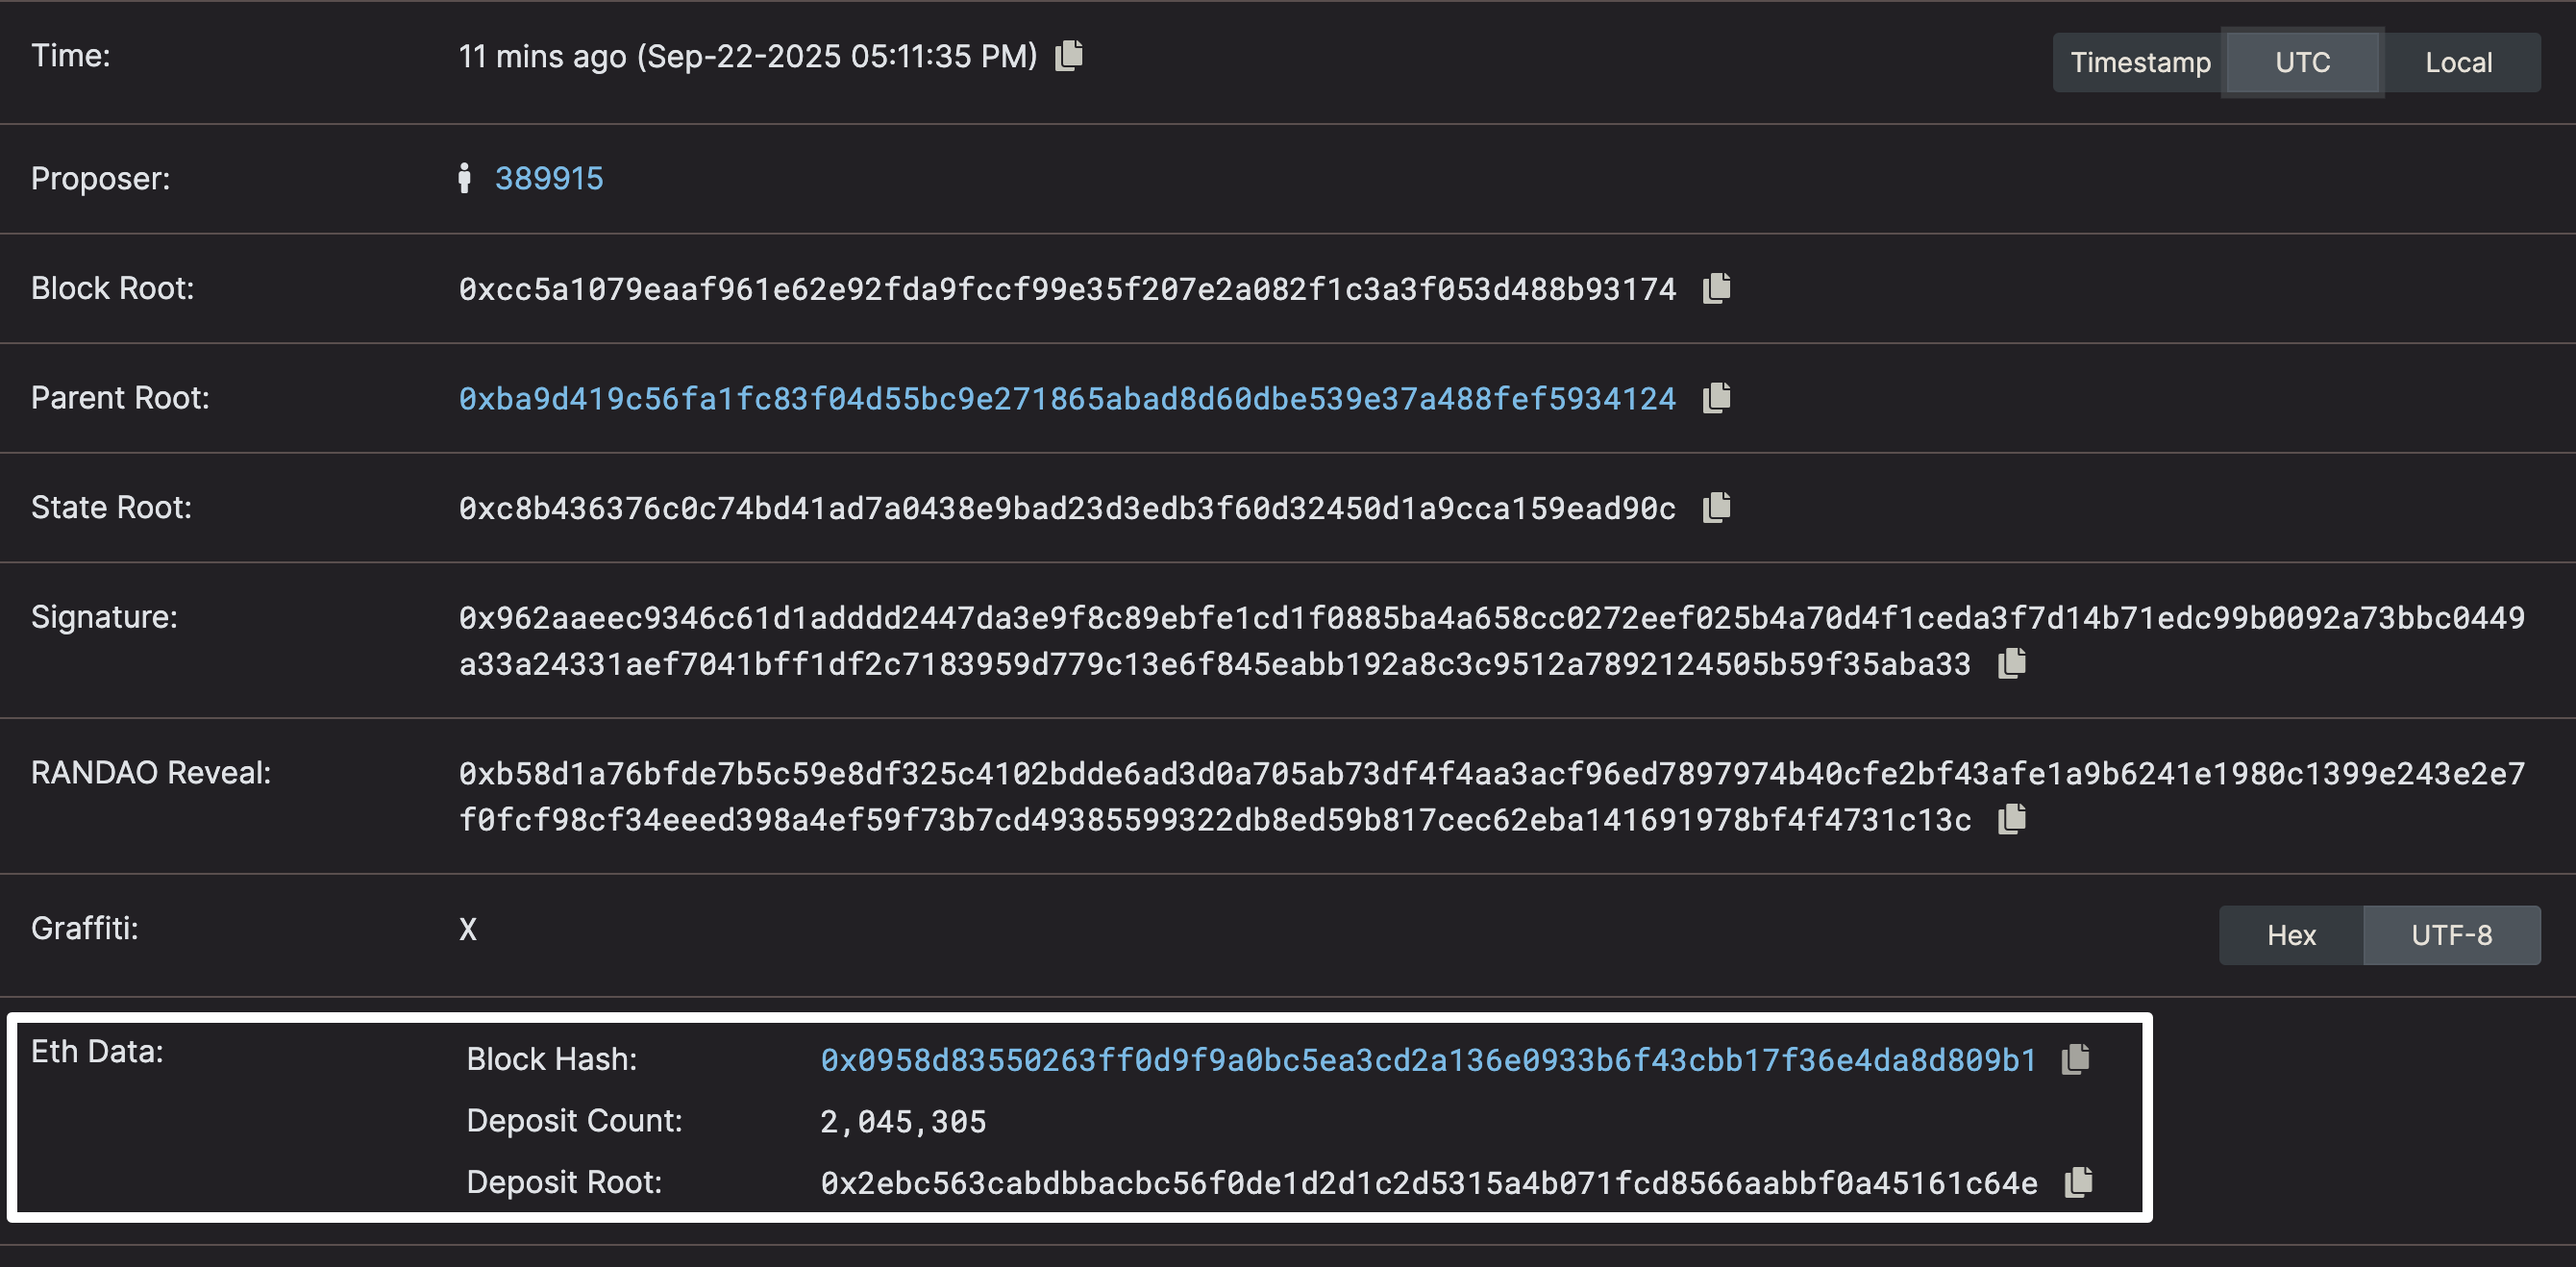
此处的 Block Hash 终止在 0x0958d83550263ff0d9f9a0bc5ea3cd2a136e0933b6f43cbb17f36e4da8d809b1,产生该区块的 slot 是 364085,而 Electra 升级的 slot 是 364032(可以在 此文档 内找到升级的具体时间,Pectra 升级包含执行层升级 Prague 和共识层升级 Electra)。所以在升级后不久,所有的 PoS 节点就停止了 Eth1Data 的更新。该字段实际上等同于被废弃。
目前 PoS 节点确定 deposit 的方法很简单,就是直接读取区块内存款合约抛出的事件进行处理。目前 Beacon Block 内会包含以下数据:
{
  "execution_requests": {
  "deposits": [
    {
      "pubkey": "0xada8cbda3e18b5eccfaed1d777dbd3c6a43b2debecd157b179f33a781c0c48183b7b5cc263b235d61829b236b38c704e",
      "withdrawal_credentials": "0x0100000000000000000000007e2a2fa2a064f693f0a55c5639476d913ff12d05",
      "amount": "32000000000",
      "signature": "0xa3d1ea016677ef70131a653195b4237f74786be19db7ce6650c383d396c8413e420741c1a62cfb7e8287c39d37b5b30606bd1c9d886a43ad4c21c2f38f9f69e7087d5038d2e960b38fabb363f4c0ddac946479e24601aa3c817e32dd29e4bfc3",
      "index": "2251904"
    }
  ],
  "withdrawals": [],
  "consolidations": []
  }
}
该数据就是用户存款的事件内容。由于共识层直接可以出块,所以假如出块者做恶,恶意修改了 deposits 事件信息,那么该行为很快就会被发现,出块者将被 slash 惩罚。对于存款而言,共识层使用 Casper FFG 共识算法保证在 2 epoch 内将区块最终化,所以存款人只需要等待 12.8 分钟就可以确定存款安全。假如读者对该部分非常感兴趣,可以阅读 lighthouse 在 process_operations.rs 内实现的 process_deposits 等函数。每一个区块可以容纳的存款交易是有限的,目前每一个区块可以容纳 16 笔存款交易,假如单一区块容纳的存款交易超过 16 笔交易,那么该起会被视为无效区块:
let expected_deposit_len = std::cmp::min(
    E::MaxDeposits::to_u64(),
    eth1_deposit_index_limit.safe_sub(state.eth1_deposit_index())?,
);
block_verify!(
    deposits.len() as u64 == expected_deposit_len,
    BlockProcessingError::DepositCountInvalid {
        expected: expected_deposit_len as usize,
        found: deposits.len(),
    }
);
上述代码中的
E::MaxDeposits实际上是指MAX_DEPOSITS常量,我们可以在consensus/types/presets/mainnet/phase0.yaml找到该配置
当用户的 Deposit 成功后,用户无法立即成为 ETH 验证者,而是会进入另一个等待激活的队列。激活队列会在每一个 Epoch 结束时进行处理,当以下任一条件被满足后,我们就会 完成 本次激活队列处理,队列内剩余的用户会在下一次 Epoch 时再次处理:
- 处理的超过
MAX_PENDING_DEPOSITS_PER_EPOCH数量的存款(目前MAX_PENDING_DEPOSITS_PER_EPOCH = 16) - 达到每一个区块的最大 ETH 存入上限(
is_churn_limit_reached)
简单来说,每一个 Epoch 能激活多少节点既与当前队列中累计的存款数量有关,也与每一笔存款的 ETH 数量有关。在此处,我们重点介绍目前在资料中极少出现的 is_churn_limit_reached 。(如无特殊说明,以下所有代码都来自 consensus/state_processing/src/per_epoch_processing/single_pass.rs 文件)该变量的赋值代码如下:
// Check if deposit fits in the churn, otherwise, do no more deposit processing in this epoch.
is_churn_limit_reached =
    processed_amount.safe_add(deposit.amount)? > available_for_processing;
if is_churn_limit_reached {
    break;
}
上述代码内的 available_for_processing 有关的代码如下:
let available_for_processing = state
    .deposit_balance_to_consume()?
    .safe_add(state.get_activation_exit_churn_limit(spec)?)?;
我们首先跳过 deposit_balance_to_consume() 函数返回值,该函数在大部份情况下都会返回 0,具体原因会在后文讨论。此处的 get_activation_exit_churn_limit 是核心函数,对应的有关代码如下:
pub fn get_balance_churn_limit(&self, spec: &ChainSpec) -> Result<u64, Error> {
    let total_active_balance = self.get_total_active_balance()?;
    let churn = std::cmp::max(
        spec.min_per_epoch_churn_limit_electra, // 128 ETH
        total_active_balance.safe_div(spec.churn_limit_quotient)?, // active balance / 65536
    );

    Ok(churn.safe_sub(churn.safe_rem(spec.effective_balance_increment)?)?)
}

/// Return the churn limit for the current epoch dedicated to activations and exits.
pub fn get_activation_exit_churn_limit(&self, spec: &ChainSpec) -> Result<u64, Error> {
    Ok(std::cmp::min(
        spec.max_per_epoch_activation_exit_churn_limit, // 256 ETH
        self.get_balance_churn_limit(spec)?,
    ))
}
上述代码内出现的所有常量都使用注释进行标注,注意本文使用的常量都是 Pectra 升级后的结果,这些常量分别对应 MIN_PER_EPOCH_CHURN_LIMIT_ELECTRA / CHURN_LIMIT_QUOTIENT / MAX_PER_EPOCH_ACTIVATION_EXIT_CHURN_LIMIT,读者可以随时在共识层客户端实现内搜索这些常量。目前,由于 total_active_balance 代表当前共识层内所有活跃验证者 ETH 的总数量,该数量极大,这导致 get_balance_churn_limit 计算出的数值远大于 256 ETH,所以我们可以直接认为每一个 Epoch 可以容纳最大 256 ETH 存款。这也是为什么 Pectrified 出现了如下显示:
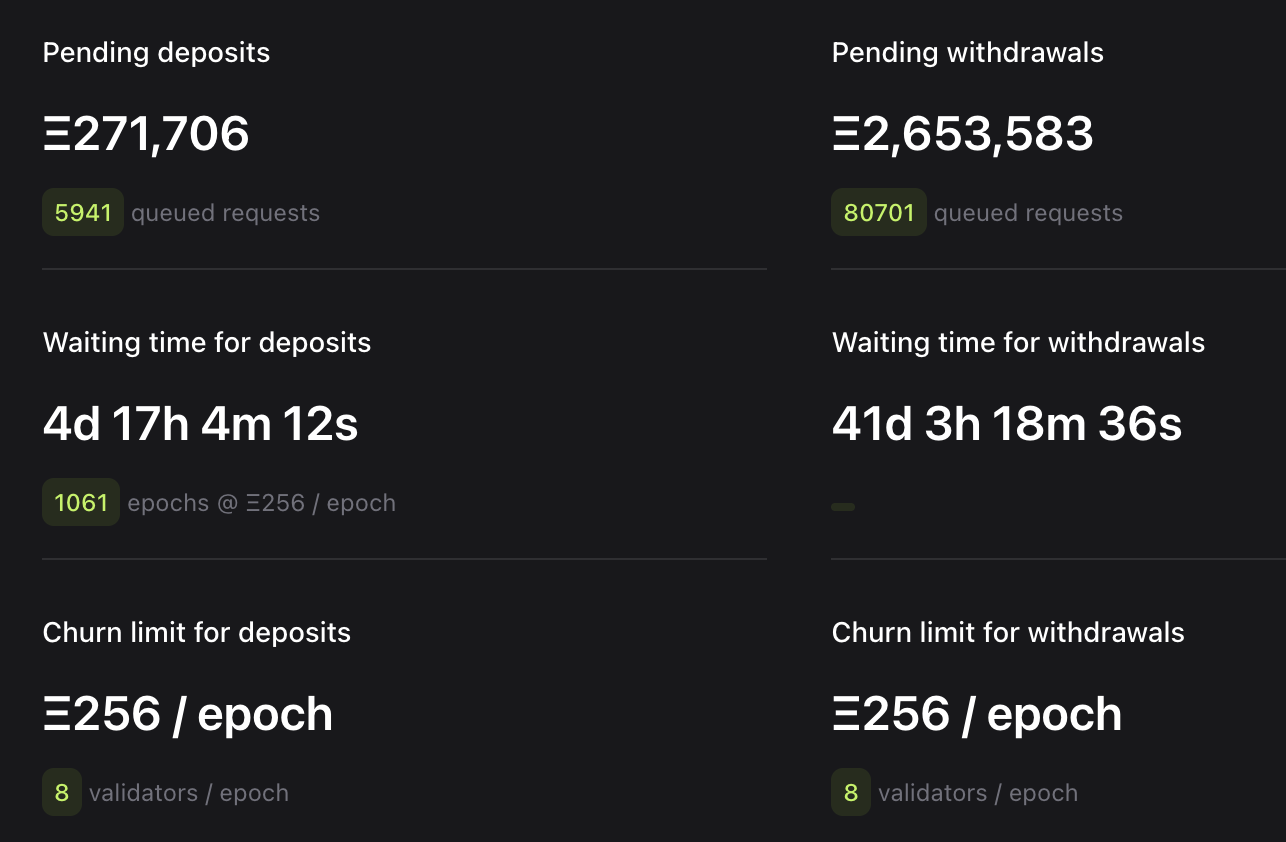
Pectrified 很好的显示了目前共识层存款队列的逻辑,即每一个 Epoch 在完成 256 ETH 或者 16 个验证者进入后就会完成此轮激活,队列内剩下的验证者会在下一轮进入(笔者怀疑上图内的
8 validators / epoch是 256 ETH / 32 ETH = 8 validators)。目前 Validatorqueue 就是用了当前存款队列内待激活的 ETH 总数量与 128 ETH 相除计算等待时间
最后我们处理上文内没有介绍的 deposit_balance_to_consume 。该变量更新逻辑是当触碰到存款上限后,将该笔没有处理的碰触到 churn_limit 的交易转入下一次处理。在大部份情况下,该变量的数值都应该为 0,只有出现单笔大宗 ETH 存入时才会出现转入下一次处理的情况,该机制是为了保证超过 256 ETH 的存入可以在下一个 Epoch 内被处理,避免待激活存款队列被卡死。
// Accumulate churn only if the churn limit has been hit.
let deposit_balance_to_consume = if is_churn_limit_reached {
    available_for_processing.safe_sub(processed_amount)?
} else {
    0
};
当存款者在队列中被激活后,存款者就可以正常参与 PoS 投票获得奖励以及参与出块。
退出
在上一节中,我们花费了大篇幅介绍了 PoS 内的存款机制。而验证者节点获得奖励的过程的方法在上文没有出现,实际上使用 Type1 withdrawal credentials 的验证者会自动获得区块奖励,即验证者可以无 gas 的自动增加余额。
![]()
至于为什么验证者可以间隔一段时间获得奖励?这其实也是退出环节涉及到的机制,所以验证者退出包含两个问题:
- Type 1 验证者获得的奖励自动分发(即上图显示的 Withdrawals)的问题,该活动涉及到共识层内部分提款(Partial withdrawals)
- Type 2 验证者奖励手动提取问题,该活动涉及到共识层内的待定部分提款(Pending partial withdrawals)
- 验证者退出所有质押 ETH 的问题,该活动涉及到共识层内的全部提款(Full withdrawals)
所谓 Type 2 验证者是指使用 Pectra 内引入的 Type2 withdrawal credentials 的验证者,Type 2 验证者无法自动在执行层地址内获得奖励,这些奖励会计入到验证者质押余额内,验证者只能发起提款请求手动提取奖励。但对于 Type 2 验证者,假如 PoS 质押余额大于 2048 ETH 后仍可以享受自动的奖励提取。
Kiln 退出流程
在上文中,我们介绍了 Kiln 合约内存款系统。在本阶段,我们首先介绍 Kiln 的提款流程。在 StakingContract.sol 内,存在 withdrawCLFee 函数,该函数调用后会触发 _deployAndWithdraw 函数。
/// @notice Withdraw the Consensus Layer Fee for a given validator public key
/// @dev Funds are sent to the withdrawer account
/// @param _publicKey Validator to withdraw Consensus Layer Fees from
function withdrawCLFee(bytes calldata _publicKey) external {
    _onlyWithdrawerOrAdmin(_publicKey);
    _deployAndWithdraw(_publicKey, CONSENSUS_LAYER_SALT_PREFIX, StakingContractStorageLib.getCLDispatcher());
}
在 Kiln 存款合约的分析时提到 Kiln 将 Type1 withdrawal credentials 设置为一个智能合约地址,此处的 _deployAndWithdraw 会在该智能合约地址内部署。该函数的实现如下:
/// @notice Internal utility to deploy and withdraw the fees from a receiver
/// @param _publicKey Public Key assigned to the receiver
/// @param _prefix Prefix used to generate multiple receivers per public key
/// @param _dispatcher Address of the dispatcher contract
function _deployAndWithdraw(
    bytes memory _publicKey,
    uint256 _prefix,
    address _dispatcher
) internal {
    bytes32 publicKeyRoot = _getPubKeyRoot(_publicKey);
    _revertIfSanctioned(msg.sender);
    bytes32 feeRecipientSalt = sha256(abi.encodePacked(_prefix, publicKeyRoot));
    address implementation = StakingContractStorageLib.getFeeRecipientImplementation();
    address feeRecipientAddress = Clones.predictDeterministicAddress(implementation, feeRecipientSalt);
    if (feeRecipientAddress.code.length == 0) {
        Clones.cloneDeterministic(implementation, feeRecipientSalt);
        IFeeRecipient(feeRecipientAddress).init(_dispatcher, publicKeyRoot);
    }
    IFeeRecipient(feeRecipientAddress).withdraw();
}
这也是一个非常简单的函数,就是我们之前存款内指定提款地址内真正部署 FeeRecipient 智能合约,然后调用部署好的 FeeRecipient 合约的 init 函数,初始化时我们会向 FeeRecipient 初始化 _dispatcher 和 _publicKeyRoot。对于 FeeRecipient 合约,我们可以看到如下几个函数:
/// @notice Triggers a withdrawal by sending its funds + its public key root to the dispatcher
/// @dev Can be called by any wallet as recipients are not parameters
function withdraw() external {
    dispatcher.dispatch{value: address(this).balance}(publicKeyRoot);
}
此处的调用的 dispatcher 源代码位于 ConsensusLayerFeeDispatcher 文件,我们只需要阅读该合约内的 dispatch 函数,该函数实现如下:
/// @notice Performs a withdrawal on this contract's balance
function dispatch(bytes32 _publicKeyRoot) external payable {
    IStakingContractFeeDetails stakingContract = IStakingContractFeeDetails(
        STAKING_CONTRACT_ADDRESS_SLOT.getAddress()
    );

    uint256 balance = address(this).balance; // this has taken into account msg.value
    if (balance == 0) {
        revert ZeroBalanceWithdrawal();
    }

    bool exitRequested = stakingContract.getExitRequestedFromRoot(_publicKeyRoot);
    bool withdrawn = stakingContract.getWithdrawnFromPublicKeyRoot(_publicKeyRoot);

    uint256 nonExemptBalance = balance;

    if (exitRequested && balance >= 31 ether && !withdrawn) {
        // If the skimmed rewards were withdrawn and the validator then underperformed
        // an healthy exit can be slightly lower than 32 ETH
        // We exempt the balance up to 32 ETH, happens only once.
        // !withdrawn prevents this logic being reused to not pay the fee on rewards
        uint256 exemption = nonExemptBalance > 32 ether ? 32 ether : nonExemptBalance;
        nonExemptBalance -= exemption;
        stakingContract.toggleWithdrawnFromPublicKeyRoot(_publicKeyRoot);
    }
    // In case of slashing the exit is not requested we don't exempt anything
    // This is in case of slashing, the staker will be rebated manually
    // A slashed validator may have accumulated enough skimmed rewards to still have a balance > 32 ETH
    // All of this will be taken into account and the staker will be compensated for the commission taken
    // on its principal and the loss according to the SLA described in the Terms&Conditions

    uint256 globalFee = (nonExemptBalance * stakingContract.getGlobalFee()) / BASIS_POINTS;
    uint256 operatorFee = (globalFee * stakingContract.getOperatorFee()) / BASIS_POINTS;
    address operator = stakingContract.getOperatorFeeRecipient(_publicKeyRoot);
    address treasury = stakingContract.getTreasury();
    address withdrawer = stakingContract.getWithdrawerFromPublicKeyRoot(_publicKeyRoot);

    (bool status, bytes memory data) = withdrawer.call{value: balance - globalFee}("");
    if (status == false) {
        revert WithdrawerReceiveError(data);
    }
    if (globalFee > 0) {
        (status, data) = treasury.call{value: globalFee - operatorFee}("");
        if (status == false) {
            revert TreasuryReceiveError(data);
        }
    }
    if (operatorFee > 0) {
        (status, data) = operator.call{value: operatorFee}("");
        if (status == false) {
            revert FeeRecipientReceiveError(data);
        }
    }
    emit Withdrawal(
        withdrawer,
        operator,
        _publicKeyRoot,
        balance - globalFee,
        operatorFee,
        globalFee - operatorFee
    );
}
上述代码首先使用 exitRequested && balance >= 31 ether && !withdrawn 判断当前提款合约对应的验证者是否属于提取 32 ETH 本金的状态。其中 exitRequested 代表用户是否在 StakingContract 内是否请求了提款。在 Kiln 正常执行时,用户需要调用 StakingContract 的 requestValidatorsExit 函数抛出事件要求目前托管的验证者节点执行退出,同时在 StakingContract 内将当前 _publicKeyRoot 设置为 exitRequest = true。注意,虽然目前 Kiln 已经将所有验证者进行了质押退出,但我们在提取资产时仍需要首先调用 requestValidatorsExit 函数,假如我们不调用该函数,那么退回给提款合约的 32 ETH 会被视为质押奖励被抽取 6% 手续费。对于 dispatch 的其他代码,读者可以自行阅读,都较为简单。具体逻辑是计算用户的质押奖励,并且提取手续费。
部分提款(Partial withdrawals)
在本节开始,我们展示了提款地址内来自 Beacon 的奖励。这种奖励分发实际上被定义为 部分提款(Partial withdrawals)。在共识层打包区块时,出块的共识层节点会在每一个区块最后插入 16 笔提款交易。
我们需要首先知道以太坊共识层所有的节点有一个自己的 index,在共识层节点软件内存在一个列表存储了目前所有的活动节点,并且还存在一个游标指向上次提款交易处理的位置。在此基础上,那么我们该如何获得提款交易呢?共识层内规定了 get_expected_withdrawals 函数,该函数用于获取提款交易。
我们首先阅读最基础的初始化部分:
pub fn get_expected_withdrawals<E: EthSpec>(
    state: &BeaconState<E>,
    spec: &ChainSpec,
) -> Result<(Withdrawals<E>, Option<usize>), BlockProcessingError> {
    let epoch = state.current_epoch();
    let mut withdrawal_index = state.next_withdrawal_index()?;
    let mut validator_index = state.next_withdrawal_validator_index()?;
    let mut withdrawals = Vec::<Withdrawal>::with_capacity(E::max_withdrawals_per_payload()); // max_withdrawals_per_payload = 16
    let fork_name = state.fork_name_unchecked();

    let bound = std::cmp::min(
        state.validators().len() as u64,
        spec.max_validators_per_withdrawals_sweep,
    );

    for _ in 0..bound {
在 get_expected_withdrawals 函数的开始部分,我们使用 let mut withdrawals = Vec::<Withdrawal>::with_capacity(E::max_withdrawals_per_payload()); 初始化了一个长度为 16 个的列表,该列表用于存储提款交易。在此处,我们跳过了 Pectra 升级引入的 pending partial withdrawals 的处理。我们会在后文介绍。
然后,我们使用 std::cmp::min 计算 bound,确定我们需要迭代多少次,其中 MAX_VALIDATORS_PER_WITHDRAWALS_SWEEP: 16384 。简单来说,在每次扫描时,我们会扫描最大 16384 个验证者,并最多从中抽取 16 个符合提款要求的验证者进行提款。
在扫描过程中,因为可能存在验证者进行了 pending partial withdrawals 所以会导致直接读取 state 内的验证者节点余额与实际上在 withdraw 过程中的余额不一致,所以我们第一步会排除 pending partial withdrawals 的影响计算出目前真正的余额:
let validator = state.get_validator(validator_index as usize)?;
let partially_withdrawn_balance = withdrawals
    .iter()
    .filter_map(|withdrawal| {
        (withdrawal.validator_index == validator_index).then_some(withdrawal.amount)
    })
    .safe_sum()?;
let balance = state
    .balances()
    .get(validator_index as usize)
    .ok_or(BeaconStateError::BalancesOutOfBounds(
        validator_index as usize,
    ))?
    .safe_sub(partially_withdrawn_balance)?;
然后我们会看到以下代码:
if validator.is_partially_withdrawable_validator(balance, spec, fork_name) {
    withdrawals.push(Withdrawal {
        index: withdrawal_index,
        validator_index,
        address: validator
            .get_execution_withdrawal_address(spec)
            .ok_or(BlockProcessingError::WithdrawalCredentialsInvalid)?,
        amount: balance.safe_sub(validator.get_max_effective_balance(spec, fork_name))?,
    });
    withdrawal_index.safe_add_assign(1)?;
}
if withdrawals.len() == E::max_withdrawals_per_payload() {
    break;
}
validator_index = validator_index
    .safe_add(1)?
    .safe_rem(state.validators().len() as u64)?;
以上代码内的 is_partially_withdrawable_validator 是一个核心函数,该函数决定了验证者是否可以提取奖励,我们会在后文专门分析该函数,此处我们关注 withdrawals 内部的 amount。我们可以看到在部分提款中,验证者可以提取 balance.safe_sub(validator.get_max_effective_balance(spec, fork_name))? 的奖励。此处使用的 get_max_effective_balance 实现如下:
pub fn get_max_effective_balance(&self, spec: &ChainSpec, current_fork: ForkName) -> u64 {
    if current_fork >= ForkName::Electra {
        if self.has_compounding_withdrawal_credential(spec) {
            spec.max_effective_balance_electra // 2048 ETH
        } else {
            spec.min_activation_balance // 32 ETH
        }
    } else {
        spec.max_effective_balance
    }
}
简单来说对于使用 Type 2 类型的用户而言,其 max_effective_balance 是 2048 ETH,而对于使用 Type 1 类型的用户而言,max_effective_balance 是 32 ETH。
回到上文的代码分析,代码中的 withdrawals.len() == E::max_withdrawals_per_payload() 用于打破扫描,因为每一个区块最终只能包含 16 笔提款交易。最后的 validator_index 更新也是一个核心代码,我们可以看到 validator_index 利用取余操作(safe_rem)实现了回环。
最后,我们阅读 is_partially_withdrawable_validator 函数,该函数实现如下:
/// Returns `true` if the validator is partially withdrawable.
///
/// Calls the correct function depending on the provided `fork_name`.
pub fn is_partially_withdrawable_validator(
    &self,
    balance: u64,
    spec: &ChainSpec,
    current_fork: ForkName,
) -> bool {
    if current_fork.electra_enabled() {
        self.is_partially_withdrawable_validator_electra(balance, spec, current_fork)
    } else {
        self.is_partially_withdrawable_validator_capella(balance, spec)
    }
}
Pectra 升级后,我们只需要关注 is_partially_withdrawable_validator_electra 函数即可,该函数实现如下:
/// Returns `true` if the validator is partially withdrawable.
///
/// Modified in electra as part of EIP 7251.
pub fn is_partially_withdrawable_validator_electra(
    &self,
    balance: u64,
    spec: &ChainSpec,
    current_fork: ForkName,
) -> bool {
    let max_effective_balance = self.get_max_effective_balance(spec, current_fork);
    let has_max_effective_balance = self.effective_balance == max_effective_balance;
    let has_excess_balance = balance > max_effective_balance;
    self.has_execution_withdrawal_credential(spec)
        && has_max_effective_balance
        && has_excess_balance
}
简单来说,用户满足以下三个条件可以进行部分提款:
has_execution_withdrawal_credential要求验证者持有 Type 1 或 Type 2 类型的提款凭证has_max_effective_balance要求用户的有效余额大于max_effective_balance,我们已经在上文介绍过max_effective_balance的获取方法has_excess_balance即用户余额大于max_effective_balance,该特殊条件适用于pending partial withdrawals后余额仍大于max_effective_balance的情况,属于一种边界条件处理
待定部分提款(Pending partial withdrawals)
待定部分提款实际上在上文的 get_expected_withdrawals 内已经有了简单出现,待定部分提款会在部分提款之前进行处理。待定部分提款是一个需要验证者请求然后才会处理的机制。那么验证者如何发起提款请求?在 Pectra 升级中,我们引入了 EIP-7002。该 EIP 在主网引入了 0x00000961Ef480Eb55e80D19ad83579A64c007002 合约(在后文中,我们称之为提款请求合约)。验证者可以使用自己的 withdrawal credentials 对应的地址向该合约发起交易来请求提款。在本节中,我们首先介绍执行层内提款请求合约的内容,在本节的最后,我们介绍共识层内的客户端对提款请求的处理。
目前提款请求合约接受以下三种请求:
- 假如请求的
calldata长度为 0,那么提款请求合约将触发Fee getter逻辑,返回提款请求所需要的费用 - 假如请求长度为 56 bytes,那么提款请求合约将触发
Add Withdrawal Request逻辑,存储用户的提款请求 - 假如请求来自
SYSTEM_ADDRESS(0xfffffffffffffffffffffffffffffffffffffffe) 会触发System Call弹出该区块内记录的提款请求
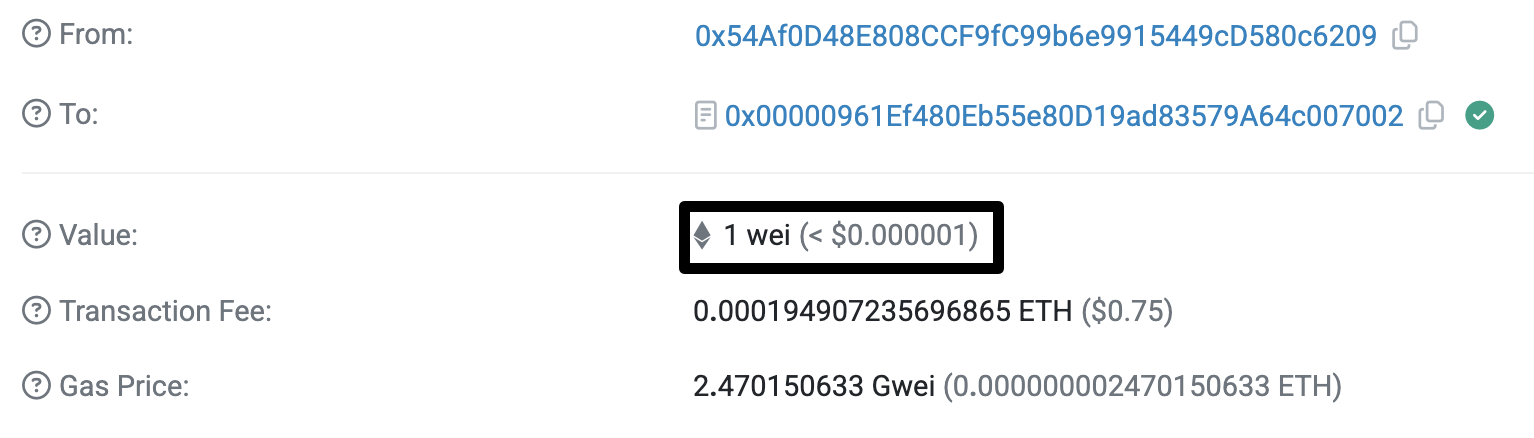
我们首先介绍 Fee getter 逻辑,该逻辑会返回当前发起提款请求需要额外支付的 value。比如下图 交易 中,交易发起者为交易支付了 1 wei。
上述费用的计算方法是: $$ fee = \text{1 wei} \times e^{\frac{\text{excess}}{17}} $$
其中 excess 代表当前执行层提款请求合约相对于每一个区块目标值(TARGET_WITHDRAWAL_REQUESTS_PER_BLOCK = 2) 超出的总数量,计算方法如下:
previous_excess = sload(WITHDRAWAL_REQUEST_PREDEPLOY_ADDRESS, EXCESS_WITHDRAWAL_REQUESTS_STORAGE_SLOT)
count = sload(WITHDRAWAL_REQUEST_PREDEPLOY_ADDRESS, WITHDRAWAL_REQUEST_COUNT_STORAGE_SLOT)
if previous_excess + count > TARGET_WITHDRAWAL_REQUESTS_PER_BLOCK:
    new_excess = previous_excess + count - TARGET_WITHDRAWAL_REQUESTS_PER_BLOCK
简单来说,我们会首先读取上一个区块的 excess,然后读取当前区块的提款请求数量,通过 previous_excess + count - TARGET_WITHDRAWAL_REQUESTS_PER_BLOCK 计算出新区块的 excess 。
读者可以使用以下 cast 指令读取当前提款请求合约的 fee:
cast call 0x00000961ef480eb55e80d19ad83579a64c007002 --rpc-url $ETH_RPC_URL
接下来,我们介绍如何发起提款请求。发起请求实际上只是使用以下 SSZ Container 编码后将编码结果发送给请求提款合约即可:
const WithdrawRequest = ssz.container({
  validator_pubkey: ssz.bytes(48),
  amount: ssz.uint64,
});
当然,我们也可以使用上述 container 解码其他交易的请求,比如 该交易,解码代码如下:
import { hexToBytes } from "@noble/hashes/utils";
import * as ssz from "micro-eth-signer/advanced/ssz.js";

const calldata = hexToBytes(
  "86ee7bf82858f6913ee08515262bfa51988dd1eb64a7404604eaadc9bf89138a6d3288cd308da10e19bfbf8ec1f2297900000000073edd26",
);

const WithdrawRequest = ssz.container({
  validator_pubkey: ssz.bytes(48),
  amount: ssz.uint64,
});

const data = WithdrawRequest.decode(calldata);
console.log(data);
当提款请求合约发现用户使用了 56 bytes 长度的代码进行请求后,合约会进行请求校验,在请求内容通过校验后,会进行存储更新,将该请求写入队列内。使用 Python 编写的代码如下:
def add_withdrawal_request(Bytes48: validator_pubkey, uint64: amount):
    """
    Add withdrawal request adds new request to the withdrawal request queue, so long as a sufficient fee is provided.
    """

    # Verify sufficient fee was provided.
    fee = get_fee()
    require(msg.value >= fee, 'Insufficient value for fee')

    # Increment withdrawal request count.
    count = sload(WITHDRAWAL_REQUEST_PREDEPLOY_ADDRESS, WITHDRAWAL_REQUEST_COUNT_STORAGE_SLOT)
    sstore(WITHDRAWAL_REQUEST_PREDEPLOY_ADDRESS, WITHDRAWAL_REQUEST_COUNT_STORAGE_SLOT, count + 1)

    # Insert into queue.
    queue_tail_index = sload(WITHDRAWAL_REQUEST_PREDEPLOY_ADDRESS, WITHDRAWAL_REQUEST_QUEUE_TAIL_STORAGE_SLOT)
    queue_storage_slot = WITHDRAWAL_REQUEST_QUEUE_STORAGE_OFFSET + queue_tail_index * 3
    sstore(WITHDRAWAL_REQUEST_PREDEPLOY_ADDRESS, queue_storage_slot, msg.sender)
    sstore(WITHDRAWAL_REQUEST_PREDEPLOY_ADDRESS, queue_storage_slot + 1, validator_pubkey[0:32])
    sstore(WITHDRAWAL_REQUEST_PREDEPLOY_ADDRESS, queue_storage_slot + 2, validator_pubkey[32:48] ++ uint64_to_little_endian(amount))
    sstore(WITHDRAWAL_REQUEST_PREDEPLOY_ADDRESS, WITHDRAWAL_REQUEST_QUEUE_TAIL_STORAGE_SLOT, queue_tail_index + 1)
在实际中,我们要求用户直接传入
little-endian representation的amount,上述代码内的uint64_to_little_endian并没有真正在合约内实现
这里需要注意的,我们在存储时首先写入了 msg.sender。这是因为真正的提款请求的数据格式如下:
const WithdrawRequest = ssz.container({
  source: ssz.bytes(40),
  validator_pubkey: ssz.bytes(48),
  amount: ssz.uint64,
});
此处的 soure 代表提款请求发起的地址,在共识层内,我们会在 process_withdrawal_requests 函数内进行如下校验,避免某些用户发起未授权请求将其他用户提款。
let is_correct_source_address = validator
    .get_execution_withdrawal_address(spec)
    .map(|addr| addr == request.source_address)
    .unwrap_or(false);
最后,我们介绍 System process 过程,该过程要求出块的执行层节点使用 SYSTEM_ADDRESS 发起交易,该交易可能是目前以太坊执行层内最奇怪的交易,该交易消耗的 gas 不计入区块的总 gas 消耗,且该交易不遵循 EIP-1559 语义,甚至该交易发起都不需要签名。目前 Reth 并没有实现 EIP7002,此处我们使用 geth 的代码介绍:
func processRequestsSystemCall(requests *[][]byte, evm *vm.EVM, requestType byte, addr common.Address) error {
	if tracer := evm.Config.Tracer; tracer != nil {
		onSystemCallStart(tracer, evm.GetVMContext())
		if tracer.OnSystemCallEnd != nil {
			defer tracer.OnSystemCallEnd()
		}
	}
	msg := &Message{
		From:      params.SystemAddress,
		GasLimit:  30_000_000,
		GasPrice:  common.Big0,
		GasFeeCap: common.Big0,
		GasTipCap: common.Big0,
		To:        &addr,
	}
	evm.SetTxContext(NewEVMTxContext(msg))
	evm.StateDB.AddAddressToAccessList(addr)
	ret, _, err := evm.Call(msg.From, *msg.To, msg.Data, 30_000_000, common.U2560)
	evm.StateDB.Finalise(true)
	if err != nil {
		return fmt.Errorf("system call failed to execute: %v", err)
	}
	if len(ret) == 0 {
		return nil // skip empty output
	}
	// Append prefixed requestsData to the requests list.
	requestsData := make([]byte, len(ret)+1)
	requestsData[0] = requestType
	copy(requestsData[1:], ret)
	*requests = append(*requests, requestsData)
	return nil
}
上述交易没有使用签名而是直接在 EVM 内执行,且执行后的结果通过 evm.StateDB.Finalise(true) 直接写入了以太坊状态。当合约发现 msg.sender == SystemAddress 时,合约执行的逻辑类似以下 Python 代码:
def read_withdrawal_requests():
    reqs = dequeue_withdrawal_requests()
    update_excess_withdrawal_requests()
    reset_withdrawal_requests_count()
    return ssz.serialize(reqs)

class ValidatorWithdrawalRequest(object):
    source_address: Bytes20
    validator_pubkey: Bytes48
    amount: uint64

def dequeue_withdrawal_requests():
    queue_head_index = sload(WITHDRAWAL_REQUEST_PREDEPLOY_ADDRESS, WITHDRAWAL_REQUEST_QUEUE_HEAD_STORAGE_SLOT)
    queue_tail_index = sload(WITHDRAWAL_REQUEST_PREDEPLOY_ADDRESS, WITHDRAWAL_REQUEST_QUEUE_TAIL_STORAGE_SLOT)
    num_in_queue = queue_tail_index - queue_head_index
    num_dequeued = min(num_in_queue, MAX_WITHDRAWAL_REQUESTS_PER_BLOCK)

    reqs = []
    for i in range(num_dequeued):
        queue_storage_slot = WITHDRAWAL_REQUEST_QUEUE_STORAGE_OFFSET + (queue_head_index + i) * 3
        source_address = address(sload(WITHDRAWAL_REQUEST_PREDEPLOY_ADDRESS, queue_storage_slot)[0:20])
        validator_pubkey = (
            sload(WITHDRAWAL_REQUEST_PREDEPLOY_ADDRESS, queue_storage_slot + 1)[0:32] + sload(WITHDRAWAL_REQUEST_PREDEPLOY_ADDRESS, queue_storage_slot + 2)[0:16]
        )
        amount = little_endian_to_uint64(sload(WITHDRAWAL_REQUEST_PREDEPLOY_ADDRESS, queue_storage_slot + 2)[16:24])
        req = ValidatorWithdrawalRequest(
            source_address=Bytes20(source_address),
            validator_pubkey=Bytes48(validator_pubkey),
            amount=uint64(amount)
        )
        reqs.append(req)

    new_queue_head_index = queue_head_index + num_dequeued
    if new_queue_head_index == queue_tail_index:
        # Queue is empty, reset queue pointers
        sstore(WITHDRAWAL_REQUEST_PREDEPLOY_ADDRESS, WITHDRAWAL_REQUEST_QUEUE_HEAD_STORAGE_SLOT, 0)
        sstore(WITHDRAWAL_REQUEST_PREDEPLOY_ADDRESS, WITHDRAWAL_REQUEST_QUEUE_TAIL_STORAGE_SLOT, 0)
    else:
        sstore(WITHDRAWAL_REQUEST_PREDEPLOY_ADDRESS, WITHDRAWAL_REQUEST_QUEUE_HEAD_STORAGE_SLOT, new_queue_head_index)

    return reqs

def update_excess_withdrawal_requests():
    previous_excess = sload(WITHDRAWAL_REQUEST_PREDEPLOY_ADDRESS, EXCESS_WITHDRAWAL_REQUESTS_STORAGE_SLOT)
    if previous_excess == EXCESS_INHIBITOR:
        previous_excess = 0

    count = sload(WITHDRAWAL_REQUEST_PREDEPLOY_ADDRESS, WITHDRAWAL_REQUEST_COUNT_STORAGE_SLOT)

    new_excess = 0
    if previous_excess + count > TARGET_WITHDRAWAL_REQUESTS_PER_BLOCK:
        new_excess = previous_excess + count - TARGET_WITHDRAWAL_REQUESTS_PER_BLOCK

    sstore(WITHDRAWAL_REQUEST_PREDEPLOY_ADDRESS, EXCESS_WITHDRAWAL_REQUESTS_STORAGE_SLOT, new_excess)

def reset_withdrawal_requests_count():
    sstore(WITHDRAWAL_REQUEST_PREDEPLOY_ADDRESS, WITHDRAWAL_REQUEST_COUNT_STORAGE_SLOT, 0)
简单来说,合约会通过 min(num_in_queue, MAX_WITHDRAWAL_REQUESTS_PER_BLOCK) 计算出目前需要从队列中提取的提款请求数量,然后将提款请求从存储内读取提款请求,然后返回给调用者。上述代码内的 MAX_WITHDRAWAL_REQUESTS_PER_BLOCK 数值是 16。
接下来,我们阅读共识层内对待定部分提款的处理,我们首先需要阅读的函数是 process_withdrawal_requests 函数,该函数接受 requests: &[WithdrawalRequest] 参数并对其进行处理。我们首先判断当前待定部分提款队列是否已满:
let amount = request.amount;
let is_full_exit_request = amount == spec.full_exit_request_amount;

// If partial withdrawal queue is full, only full exits are processed
if state.pending_partial_withdrawals()?.len() == E::pending_partial_withdrawals_limit()
    && !is_full_exit_request
{
    continue;
}
此处的 E::pending_partial_withdrawals_limit() 就是待定部分提款队列的最大长度,目前值为 134217728。注意,该参数与上文单个区块可容纳的部分提款请求的数量无关,此处的部分提款队列指共识层节点内部维护的保存所有部分提款请求的队列。在 pending_partial_withdrawals 已满的情况下,共识层节点仍会处理 is_full_exit_request 的请求,即那些在执行层提交的 request 中 amount == spec.full_exit_request_amount 的请求,此处的 spec.full_exit_request_amount 是一个常数,目前定义为 0。换言之,当我们在执行层向提款合约发起 amount = 0 的提款请求时,共识层会将该请求视为完全提款。
之后,我们会进行更多关于验证者的校验:
// Verify pubkey exists
let Some(validator_index) = state.pubkey_cache().get(&request.validator_pubkey) else {
    continue;
};

let validator = state.get_validator(validator_index)?;
// Verify withdrawal credentials
let has_correct_credential = validator.has_execution_withdrawal_credential(spec);
let is_correct_source_address = validator
    .get_execution_withdrawal_address(spec)
    .map(|addr| addr == request.source_address)
    .unwrap_or(false);

if !(has_correct_credential && is_correct_source_address) {
    continue;
}

// Verify the validator is active
if !validator.is_active_at(state.current_epoch()) {
    continue;
}

// Verify exit has not been initiated
if validator.exit_epoch != spec.far_future_epoch {
    continue;
}

// Verify the validator has been active long enough
if state.current_epoch()
    < validator
        .activation_epoch
        .safe_add(spec.shard_committee_period)? // 256
{
    continue;
}
上述验证分别验证了执行层提交的 validator_pubkey 存在,验证者具有 Type 1 或者 Type 2 类型的提款凭证(has_correct_credential),提款请求发起者是提款合约地址(is_correct_source_address) 以及验证者当前活跃(is_active_at)。随后继续校验了验证者当前不处于全部提款的流程中(validator.exit_epoch != spec.far_future_epoch),此处与后文介绍的全部提款有关。假如验证者没有处于全部提款状态下,validator.exit_epoch == spec.far_future_epoch。最后,我们验证验证者已经活跃了足够时间。
let pending_balance_to_withdraw = state.get_pending_balance_to_withdraw(validator_index)?;
if is_full_exit_request {
    // Only exit validator if it has no pending withdrawals in the queue
    if pending_balance_to_withdraw == 0 {
        initiate_validator_exit(state, validator_index, spec)?
    }
    continue;
}
上述代码校验验证者在当前部分提款队列中的余额,假如用户在提款队列中没有待定的部分提款,且用户发起提款请求时声明 is_full_exit_request,我们会调用 initiate_validator_exit 为用户启动全部提款流程,我们会在后文进一步介绍全部提款。
let balance = state.get_balance(validator_index)?;
let has_sufficient_effective_balance =
    validator.effective_balance >= spec.min_activation_balance;
let has_excess_balance = balance
    > spec
        .min_activation_balance
        .safe_add(pending_balance_to_withdraw)?;

// Only allow partial withdrawals with compounding withdrawal credentials
if validator.has_compounding_withdrawal_credential(spec)
    && has_sufficient_effective_balance
    && has_excess_balance
{
    let to_withdraw = std::cmp::min(
        balance
            .safe_sub(spec.min_activation_balance)?
            .safe_sub(pending_balance_to_withdraw)?,
        amount,
    );
    let exit_queue_epoch = state.compute_exit_epoch_and_update_churn(to_withdraw, spec)?;
    let withdrawable_epoch =
        exit_queue_epoch.safe_add(spec.min_validator_withdrawability_delay)?;
    state
        .pending_partial_withdrawals_mut()?
        .push(PendingPartialWithdrawal {
            validator_index: validator_index as u64,
            amount: to_withdraw,
            withdrawable_epoch,
        })?;
}
上述代码保证当前提款请求处理后,验证者的有效余额 effective_balance 大于最小激活余额(32 ETH),以及仍存在超额余额。最后我们确定验证者存在 Type 2 类型的提款凭证(即代码注释内的 compounding withdrawal credentials)。当然,用户并不能立即提款离开,待定部分提款的 withdrawable_epoch 是需要使用 compute_exit_epoch_and_update_churn 计算获得的,该算法设计上也是用于控制共识层 ETH 流失的方法,限于篇幅,我们不再详细介绍该函数的实现,简单来说,当用户撤出的 ETH 数量大于某一个极限,那么用户的提款时间就会延长。
上述代码实现了在执行层区块内提取提款请求,但是没有实现将提款交易真正打包到区块内部。我们在上文介绍过的 get_expected_withdrawals 函数内会执行该操作,具体有关的代码如下:
// [New in Electra:EIP7251]
// Consume pending partial withdrawals
let processed_partial_withdrawals_count =
    if let Ok(pending_partial_withdrawals) = state.pending_partial_withdrawals() {
        let mut processed_partial_withdrawals_count = 0;
        for withdrawal in pending_partial_withdrawals {
            if withdrawal.withdrawable_epoch > epoch
                || withdrawals.len() == spec.max_pending_partials_per_withdrawals_sweep as usize
            {
                break;
            }

            let validator = state.get_validator(withdrawal.validator_index as usize)?;

            let has_sufficient_effective_balance =
                validator.effective_balance >= spec.min_activation_balance;
            let total_withdrawn = withdrawals
                .iter()
                .filter_map(|w| {
                    (w.validator_index == withdrawal.validator_index).then_some(w.amount)
                })
                .safe_sum()?;
            let balance = state
                .get_balance(withdrawal.validator_index as usize)?
                .safe_sub(total_withdrawn)?;
            let has_excess_balance = balance > spec.min_activation_balance;

            if validator.exit_epoch == spec.far_future_epoch
                && has_sufficient_effective_balance
                && has_excess_balance
            {
                let withdrawable_balance = std::cmp::min(
                    balance.safe_sub(spec.min_activation_balance)?,
                    withdrawal.amount,
                );
                withdrawals.push(Withdrawal {
                    index: withdrawal_index,
                    validator_index: withdrawal.validator_index,
                    address: validator
                        .get_execution_withdrawal_address(spec)
                        .ok_or(BeaconStateError::NonExecutionAddressWithdrawalCredential)?,
                    amount: withdrawable_balance,
                });
                withdrawal_index.safe_add_assign(1)?;
            }
            processed_partial_withdrawals_count.safe_add_assign(1)?;
        }
        Some(processed_partial_withdrawals_count)
    } else {
        None
    };
我们可以看到跳出循环的条件以下两个条件满足之一即可:
withdrawal.withdrawable_epoch > epoch。在上文,我们已经介绍过待定部分提款也无法立即提取资产,也需要等待,假如验证者当前 Epoch 无法提款,那么我们就会跳过该验证者继续处理其他验证者withdrawals.len() == spec.max_pending_partials_per_withdrawals_sweep,此处的max_pending_partials_per_withdrawals_sweep的值是 8,即每一个区块只能打包最多 8 笔待定部分提款交易
至于剩下的代码,读者可以自行阅读,都较为简单或者已经在上文有所介绍。总结来说,使用待定部分提款在理论上会快于常规的部分提款流程,因为待定部分提款队列会被优先处理,而且该队列目前并不拥挤。
全部提款(Full withdrawals)
全部提款可以存在以下三种情况被触发:
- 使用提款合约发起
amount = 0的请求 - 使用
beacon/pool/voluntary_exitsAPI 发起退出请求,该请求将在共识层内广播 - 出于各种原因,验证者的有效余额小于
ejection_balance(目前是 16 ETH) 时,也会为节点启动全部提款
上述几种途径最后都会调用 initiate_validator_exit 函数,该函数实现如下:
/// Initiate the exit of the validator of the given `index`.
pub fn initiate_validator_exit<E: EthSpec>(
    state: &mut BeaconState<E>,
    index: usize,
    spec: &ChainSpec,
) -> Result<(), Error> {
    let validator = state.get_validator_cow(index)?;

    // Return if the validator already initiated exit
    if validator.exit_epoch != spec.far_future_epoch {
        return Ok(());
    }

    // Ensure the exit cache is built.
    state.build_exit_cache(spec)?;

    // Compute exit queue epoch
    let exit_queue_epoch = if state.fork_name_unchecked() >= ForkName::Electra {
        let effective_balance = state.get_effective_balance(index)?;
        state.compute_exit_epoch_and_update_churn(effective_balance, spec)?
    } else {
        let delayed_epoch = state.compute_activation_exit_epoch(state.current_epoch(), spec)?;
        let mut exit_queue_epoch = state
            .exit_cache()
            .max_epoch()?
            .map_or(delayed_epoch, |epoch| max(epoch, delayed_epoch));
        let exit_queue_churn = state.exit_cache().get_churn_at(exit_queue_epoch)?;

        if exit_queue_churn >= state.get_validator_churn_limit(spec)? {
            exit_queue_epoch.safe_add_assign(1)?;
        }
        exit_queue_epoch
    };

    let validator = state.get_validator_mut(index)?;
    validator.exit_epoch = exit_queue_epoch;
    validator.withdrawable_epoch =
        exit_queue_epoch.safe_add(spec.min_validator_withdrawability_delay)?;

    state
        .exit_cache_mut()
        .record_validator_exit(exit_queue_epoch)?;

    Ok(())
}
上述代码也非常简单,其中 compute_exit_epoch_and_update_churn 根据验证者当前的余额计算用户退出的所需要等待 Epoch 长度,在计算完成等待期后,我们设置 validator.withdrawable_epoch。
最后,我们在 get_expected_withdrawals 函数内完成最终的提款流程。该部分代码也位于 sweep 的 for 循环内部:
if validator.is_fully_withdrawable_validator(balance, epoch, spec, fork_name) {
    withdrawals.push(Withdrawal {
        index: withdrawal_index,
        validator_index,
        address: validator
            .get_execution_withdrawal_address(spec)
            .ok_or(BlockProcessingError::WithdrawalCredentialsInvalid)?,
        amount: balance,
    });
    withdrawal_index.safe_add_assign(1)?;
}
总结
在本文中,我们介绍了 Pectra 升级后以太坊共识层的更新,特别是共识层升级对提款和取款影响。在本文中,我们介绍以下内容:
- SSZ 编码算法和 Merkle Tree 的构建
- 存款合约内部增量 Merkle Tree 构建方法
- Klin 合约与存款合约交互流程
- 存款过程中共识层操作
- Klin 的退出流程
- Pectra 升级后主网提供的提款合约
- 部分提款、待定部分提款和全部提款在共识层的执行机制
实际上,本文没有涉及 Prctra 升级中的 Consolidation 机制,该机制允许验证者拥有大于 32 ETH 的有效余额,同时也引入了 CONSOLIDATION_REQUEST_PREDEPLOY_ADDRESS 合约,该合约部署在执行层,可以被调用以进行共识层余额合并。读者可以自行关注 EIP-7251 文档。